Every other year in our Sunday school, we do a recreation of a Judean Village in the year 29 C.E. Children become “apprentices” to artisans, and do activities that evoke village life in 29 C.E.
Carrying water by hand from the village well to wherever it was needed was an integral part of village life. This year, Edie Keating came up with an activity in which children learn how to use a traditional shoulder pole carrier to bring water to irrigate plants. Given the extreme drought that is blanketing most of California, this is also a very relevant activity. Ancient Judea had a very similar climate to ours — what if we had to carry all our water from a well by hand? — how would that change our water consumption habits?
I got to design a shoulder pole carrier using readily available materials. It was fun to design and build, and once it was built it was surprisingly comfortable and easy to use. This is a cool piece of ancient technology that really works well!
———
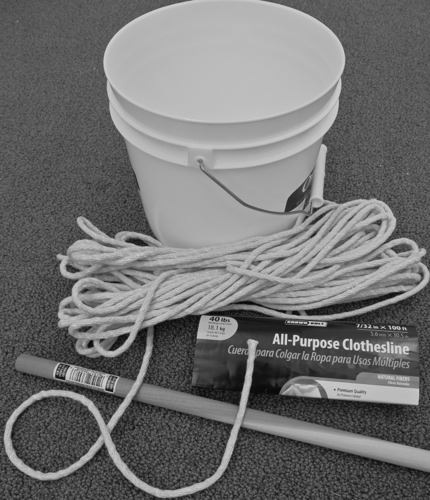
Materials for 6 pole carriers:
— 100′ of 7/32″ cotton “sash cord” or “all purpose clothesline” (easy to tie, and soft on kids’ hands if they grab it)
— 12 ea. 1-gallon plastic buckets, often sold as painter’s buckets; the ones we like best look like miniature 5-gallon buckets with sturdy reinforcement at the top (see photo above)
— 6 pcs. 5/8″ dia. 4-foot long hardwood dowels
— 9/16″ drill bit and drill (hand drills work well for this project)
———
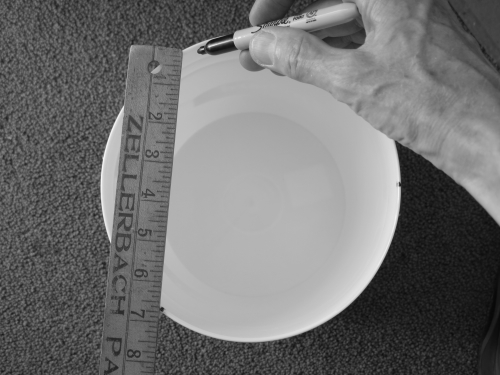
Step one:
Mark out locations for three holes spaced equally around the bucket. Our buckets were 7-3/4″ in diameter, and spacing the holes 6-3/4″ apart (as measured on a straight line, as in the photo above) provided fairly equal spacing.
———
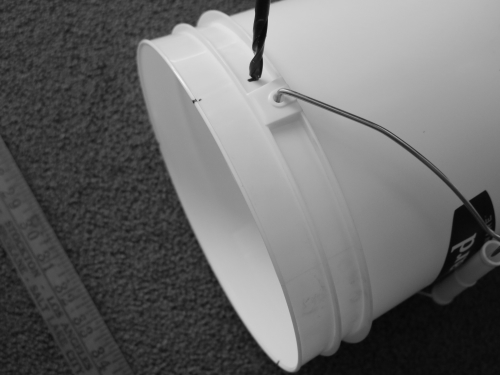
Step two:
Drill three holes as shown in the photo above.
———
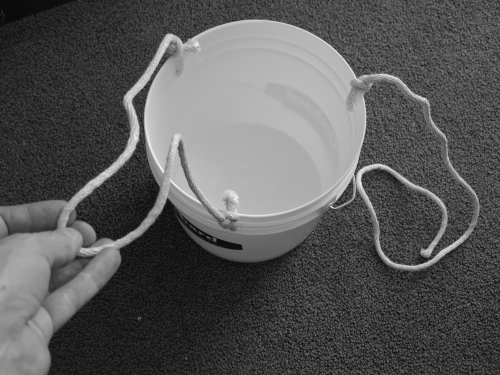
Step three:
Cut two lengths of sash cord, one 6′ long, and one 4’6″ long. Thread cord through holes and tie with two half hitches as shown — the longer piece of cord is tied at its two ends through two holes, and the shorter piece of cord is tied at one end through one hole. Note that two half hitches function as a slip knot, so snug the knot down to the bucket. (If you don’t know how to tie two half hitches, look at a Scout handbook, or search the Web for instructions.)
Make two of these assemblies, one for each end of the dowel.
———
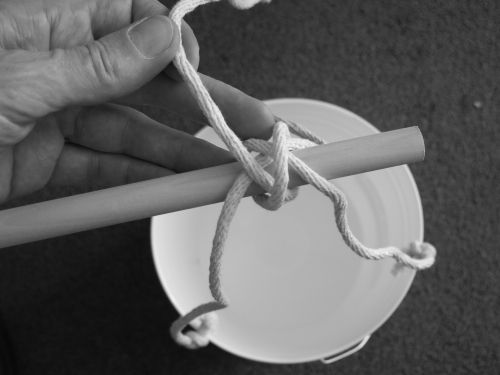
Step four:
Loop the longer rope (tied off at both ends) over the dowel. Then tie a clove hitch, using the free end of the shorter cord, so that the clove hitch goes over the longer cord, and secures it to the dowel (see photo above).
Once you get the clove hitch tied, lift up the assembly, and see how the bucket is hanging. It will probably hang unevenly, so adjust all the cords until it hangs more or less evenly — this is much easier if you get someone to hold the dowel for you. When everything looks even, snug up the clove hitch so it’s tight. (You can also tie off the free end of the rope onto one of the other ropes, using two half hitches — this makes for a slightly more secure assembly, although it isn’t really necessary.)
———

Above is what the whole thing looks like when it’s completed, with each bucket filled about 1/3 full. Don’t fill the buckets more than half full — if you do, the water will slop all over your feet when you carry it, and there’s a good chance you’ll snap the dowel from the weight.
In fact, for most school-aged children, filling the buckets about a third full will provide the most pleasant experience. With that much water in the buckets, it’s heavy enough so that the water carrier stays in place on the child’s shoulders, but it’s not so heavy that it hurts. Notice that the dowel in this design is relatively thin so that it acts as a spring, providing some cushioning to the shoulders — carrying water with this water carrier is relatively comfortable.
Of course, you can also use this type of carrier with a heavier load in the middle, and with two people carrying, one on each end of the pole. Obviously, a longer, stronger pole would be needed.
If you want to carry bigger loads with a shoulder pole carrier, use a heavier pole. Asian cultures often use bamboo for the pole — it’s a material that’s light, flexible, and strong. Traditional European shoulder pole carriers were typically less flexible, and carved (like ox yokes) to fit around the neck and put more of the load on the shoulders.