I’m in the process of developing curriculum for a couple of different eco-spirituality programs I’ll be co-leading this summer. One of the people I’ll be working with, Jessica, a former environmental educator who’s now the DRE at the Northhampton UU congregation, floated the idea of pressing plants.
Now, plant pressing is usually done to prepare specimens for an herbarium. But Jessica found a lesson plan in the Project Wild Aquatic curriculum book which uses a plant press for a process art project. You assemble a collage of aquatic plants (or really, any kind of plant) between sheets of porous paper, and press in a plant press. As the plant is pressed, the paper absorbs some of the colors of the plant. Wait a week till it’s dry, and you have a cool collage.
This activity kind of resembles flower pounding (see lesson plan #24 on this webpage). It also introduces participants to the use of a plant press — a standard botanical tool/process — which is a nice addition.
Still working on refining this activity for use with kids in a summer camp setting. We’ll see where this leads. In the mean time, a couple of resources: Plant presses for the classroom | Herbarium Supply Co.
Update, later the same day:
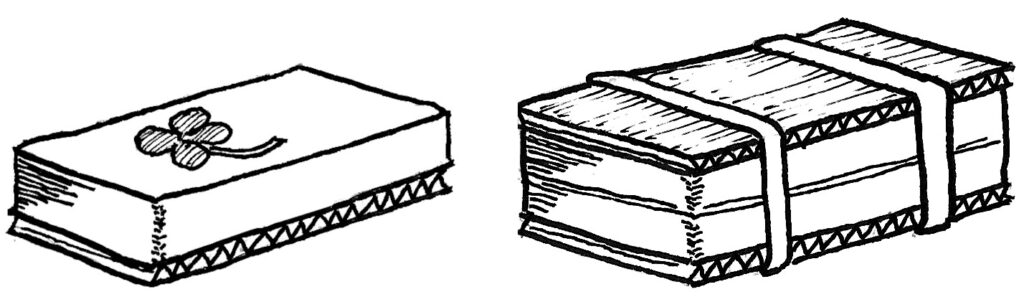
Here are my instructions for a cheapo plant press, cobbled together from several online sites:
You’ll need fifty 3×5 file cards, two pieces of corrugated carboard cut to 3×5 inches, and two strong rubber bands. Place a flower in the middle of the stack of file cards. Put the rubber bands around everything (see the drawing). Let dry for a week or more. When dry, glue the dried flower to the index card using white glue.
Snowdrops are starting to bloom outside our front door, so in a couple of days I’ll be able to give this a try in the real world.
I finally updated my post on the washtub bass with construction details of a really good instrument I built back in 2019. Here’s the update (this will take you directly to the update).
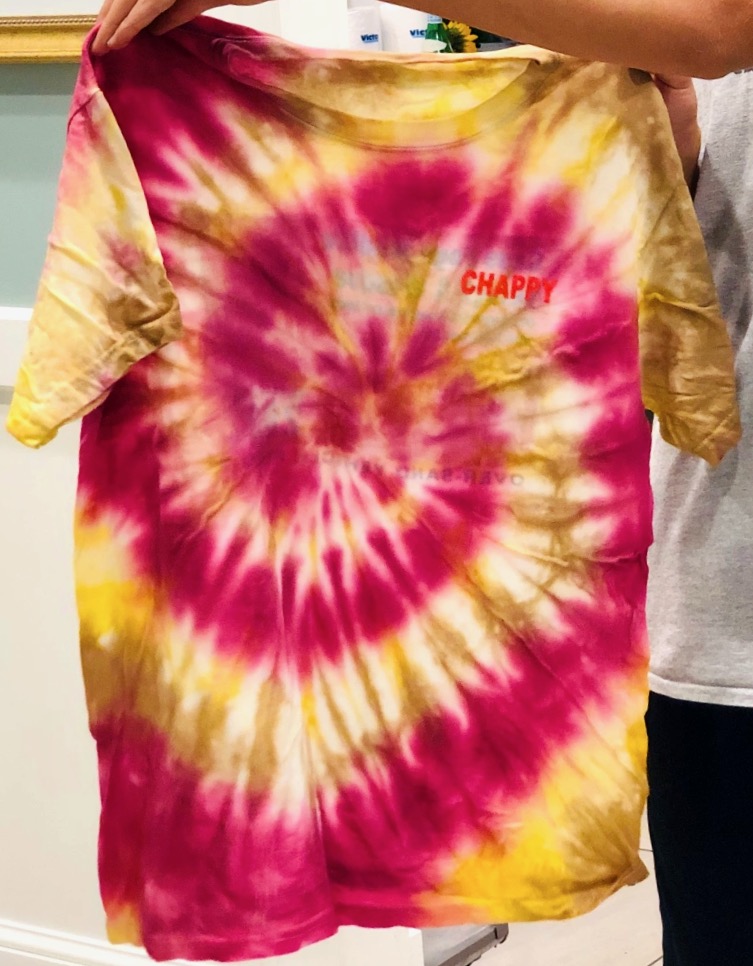
Our experiments in early August to make natural dyes using pine cones or invasive plants weren’t very successful. Subsequently, Carol did a lot of research and experimenting. When we held Ecojustice Camp in mid-August, she was able to produce some pretty good colors using natural dyes.
Tie-dye cotton t-shirt by Micah with turmeric, choke cherry, and walnut husks
The most successful colors came from turmeric powder (bright yellow), choke cherry (magenta), and black walnut husks (brown). Camper Micah brought in the choke cherries. I’m not sure what Carol’s dye recipes were, but I do know she used an alum mordant.
Right out of the dye vats, the colors were pretty spectacular. After a first washing, the colors definitely faded to some degree. Nevertheless, they were still attractive.
I liked the warm brown of the black walnut husk dye the best. I’ve been collecting walnut husks over the past couple of weeks. If I can just find the time, I’m all ready to cook up some dye with them. And if I do, I’ll post the results here.
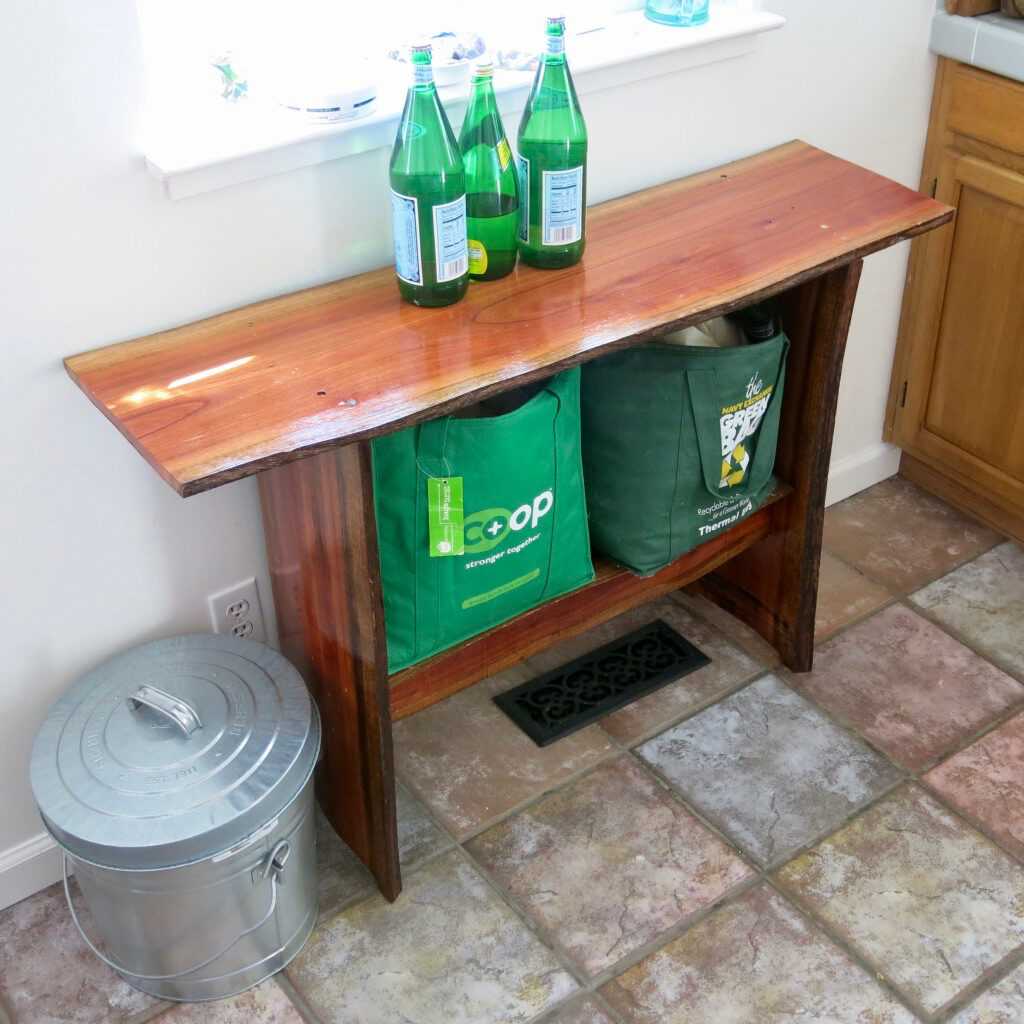
I finally have the time to do something with these boards. First I made myself a simple workbench. The boards had cupped pretty dramatically, and I had fun scribing the parts to fit to one another. Since this was just a workbench, I nailed the base together, attaching the top with brass screws (brass is softer than steel so it won’t dull sharp tools). Flattening the top proved to be a challenge. Although eucalyptus works like poplar in many ways, the grain is so intergrown that if you plane it you get lots of tearouts. Fortunately, the local Home Despot had a demonstration model belt sander that they sold me for thirty bucks.
When I got done putting a couple of coats of spar varnish on the workbench, it looked pretty good, with the deep red of the wood, the unplaned natural edges, and the organic curving lines of the cupped and warped boards — good enough that we brought it inside, where it provides a little more counter space in our tiny kitchen.
The workbench, repurposed in the kitchen as a counter.
Now I wish I’d taken more care with the joinery. But after all, it was just supposed to be a workbench.
We’ve been having some warm evenings here, warm enough to sit outside in our small back patio. I wanted to sit and the patio and read, so I picked up the LED lantern we have as emergency lighting. We now have to have emergency lanterns on hand because Pacific Gas and Electric (PG&E) has decided that in times of high fire danger, it’s cheaper to turn off power than to actually spend their shareholder’s money to upgrade their crumbling infrastructure.
The problem with LED lanterns is that you have to keep buying batteries. Plus the LED lanterns we have tend to have weird internal reflections and shadows. I looked at Carol’s collection of oil lamp parts, harvested from her scrounging expeditions, but unfortunately there weren’t enough compatible parts to make one working oil lamp.
Surely there must be a way to make a simple oil lamp without buying anything, I thought to myself. A quick Web search revealed lots of DIY plans for a glass jar oil lamp, all of which probably stem from an old Mother Earth News article on the subject.
I took one of Carol’s Mason jars, cut a piece of cotton string for the wick, and bent a piece of wire to hold the wick up, and poured in some olive oil (the only vegetable oil we happened to have on hand). The tiny wick didn’t produce enough light to read by, so I braided three pieces of string together. Now the lamp produced enough light to read by.
The glass jar oil lamp in use; I put it on an upside down clay plant pot to raise it up.
Unfortunately, with the bigger wick, the lamp produced a lot of smoke; I’d never use this lamp indoors. And the glass jar didn’t adequately shield the flame from the evening breezes, so the flame flickered and jumped, making it hard to read; in fact, I had to leave the LED lantern turned on to have enough light to read.
There’s a reason manufactured oil lamps have elaborate glass chimneys, and large flat wicks the height of which can be adjusted by a turn screw. Those technological innovations provide more light, and prevent the lamp from smoking. The glass jar oil lamp is better than nothing, so it’s useful for emergency lighting if you don’t have anything else. But with fire season due to begin soon, and with the continued incompetence of PG&E suggesting that we’re going to have more power outages this fire season, I guess I’d better bite the bullet and buy some manufactured oil lamps, with wide flat wicks and glass chimneys.
We’re all sitting at home under quarantine, with time on our hands. Not surprisingly, many of us thought, Now would be a great time to bake bread. I used to bake bread regularly, back when I lived in a group house with other twenty-somethings. We’d trade recipes and tips, and I got to be pretty good at the overnight sponge method of baking bread.
Clearly, lots of other people had the same thoughts about baking bread, and maybe even the same fond memories of how they used to bake bread. Not surprisingly, then, our local supermarket ran out of yeast three weeks ago, and I haven’t been able to purchase any yeast there since.
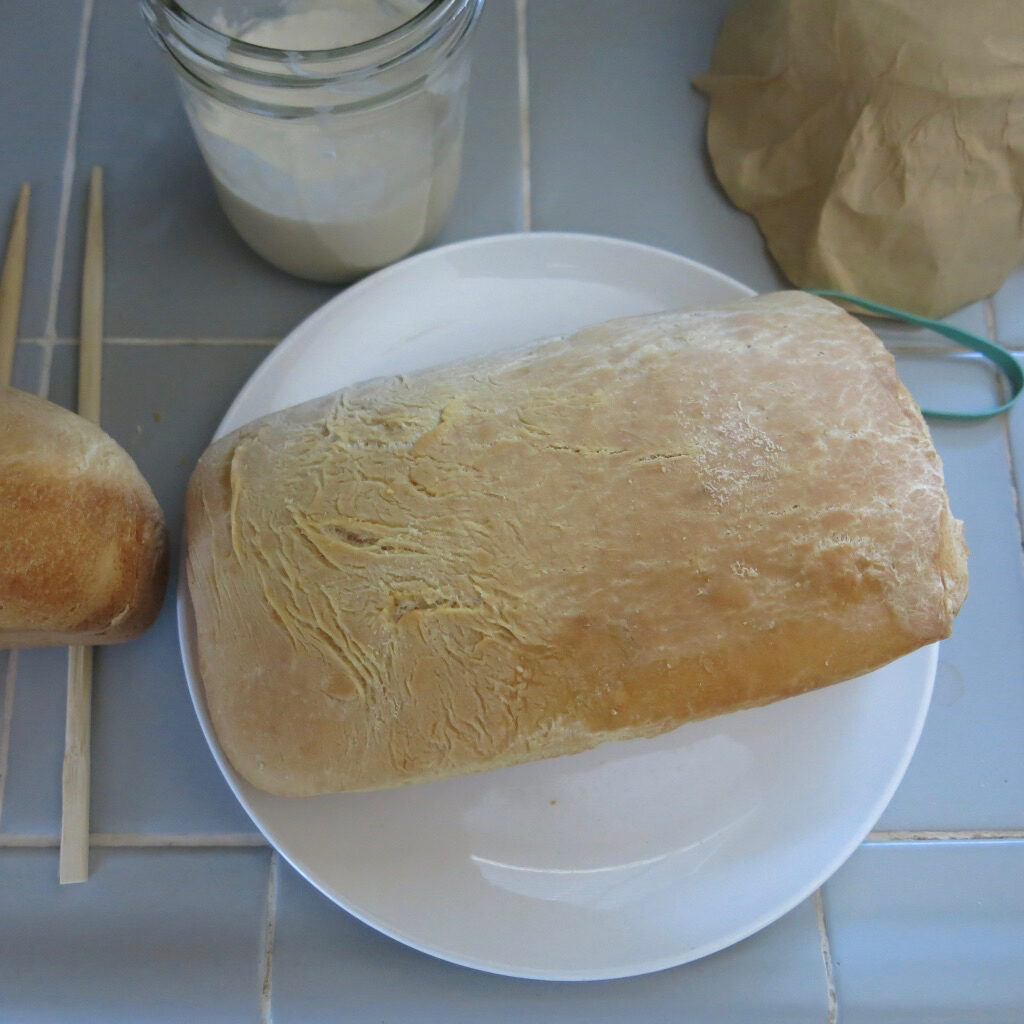
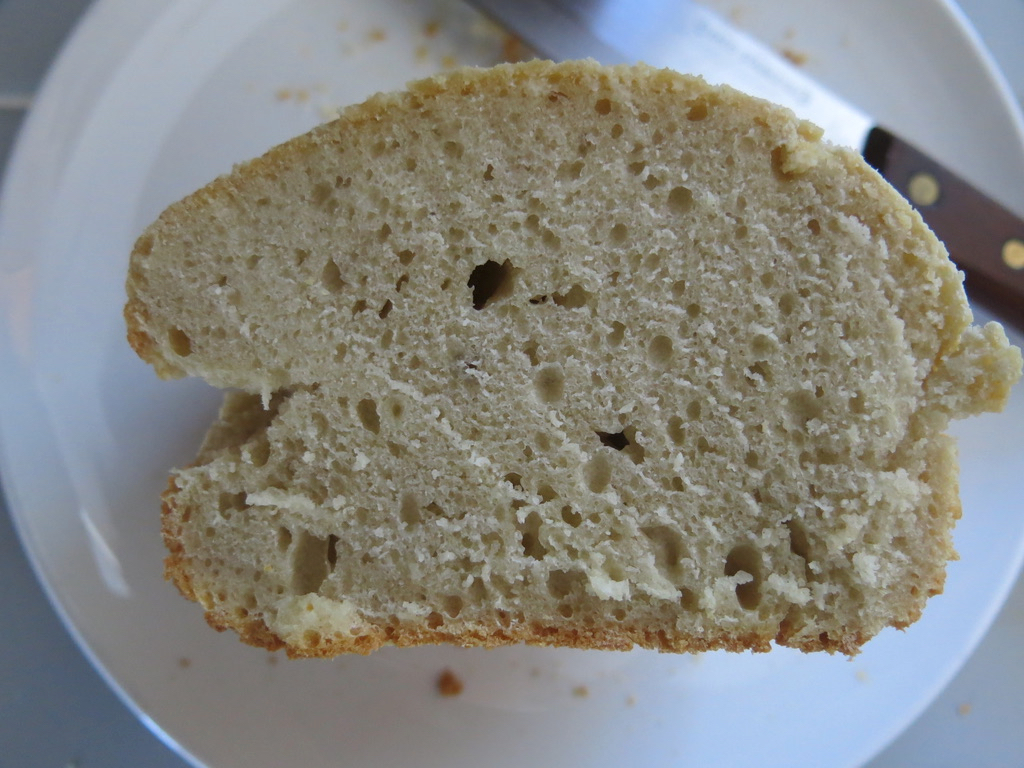
So I decided to make sourdough. I found a method online: mix a few tablespoons of flour and water, cover with something porous, then add another tablespoon of flour each morning and evening until you have a nice foaming mess of sourdough starter. It sort of worked; the flour mix bubbled a little bit, but it didn’t foam. Then I dragged out my old copy of Joy of Cooking; Marion Rombauer suggests adding a bit of sugar along with the flour, and that made the difference. Within a couple of days, I had a pint Mason jar filled with foamy sourdough starter. Then I followed the recipe for sourdough bread in Joy of Cooking, which includes eggs and some oil, and turned out two smallish but attractive loaves.
Above: Top view of a finished loaf. At left is another loaf still cooling on our chopstick cooling rack. The sourdough starter is in the jar at top, and at top right is the coffee filter I use to cover the sourdough jar.
The loaves are moist, and have a nice crumb. The taste is quite good — there’s a faint tang of sourness, but it’s not in the least harsh. But the loaves weren’t perfect, and I think I should have kneaded them a little longer, and let them rise in the bread pans a little longer.
But then, baking bread is all about perfecting your timing. And in quarantine, I’ll have plenty of time to work on my timing.
Update, April 30: The next batch of sourdough bread came out much better!
As of April 2, the San Mateo County Board of Health recommends that everyone wear a mask when they’re in public places.
I’ve been doubtful about the efficacy of masks, since my understanding is that wearing a mask won’t do much to protect you from being infected by others. But I’ve come to understand that masks might protect others from being infected by you, if you happen to have COVID-19 but are still asymptomatic.
So today I decided to be a good citizen and sew a couple of masks, one for Carol and one for me. I am very slow at sewing, partly because I don’t know how to use a sewing machine, and partly because I don’t know what I’m doing. But I found a good online video showing how to make one of the 2-layer pleated masks that are supposed to be the most effective handmade masks. I didn’t have the elastic bands called for in the video, but I had some 1/4 inch polyester cord to use for the ties. Carol has a big bolt of unbleached cotton muslin, and I sacrificed an old t-shirt. Sewing the pleats by hand was kind of a pain at first, but I quickly figured it out.
After two or three hours, I had a mask for Carol and a mask for me. We went to the grocery store, and three quarters of the people there were also wearing masks. Mask wearing peer pressure has begun.
Me wearing my mask
As soon as we got home, I washed both masks in hot water, as you’re supposed to do.
Next step: make another mask for Carol using a high fashion fabric for the outer layer….
A week-long event called “Reimagine End of Life” is taking place in San Francisco right now. As a part of this, Carol and Ms. M. will offer a workshop on Saturday called “It’s a Wrap: Design Your Own Burial Shroud.” The point of the workshop is not to make the actual shroud you’re going to be buried in, but to start thinking about a design for something that you’d like to be wrapped up in after you die.
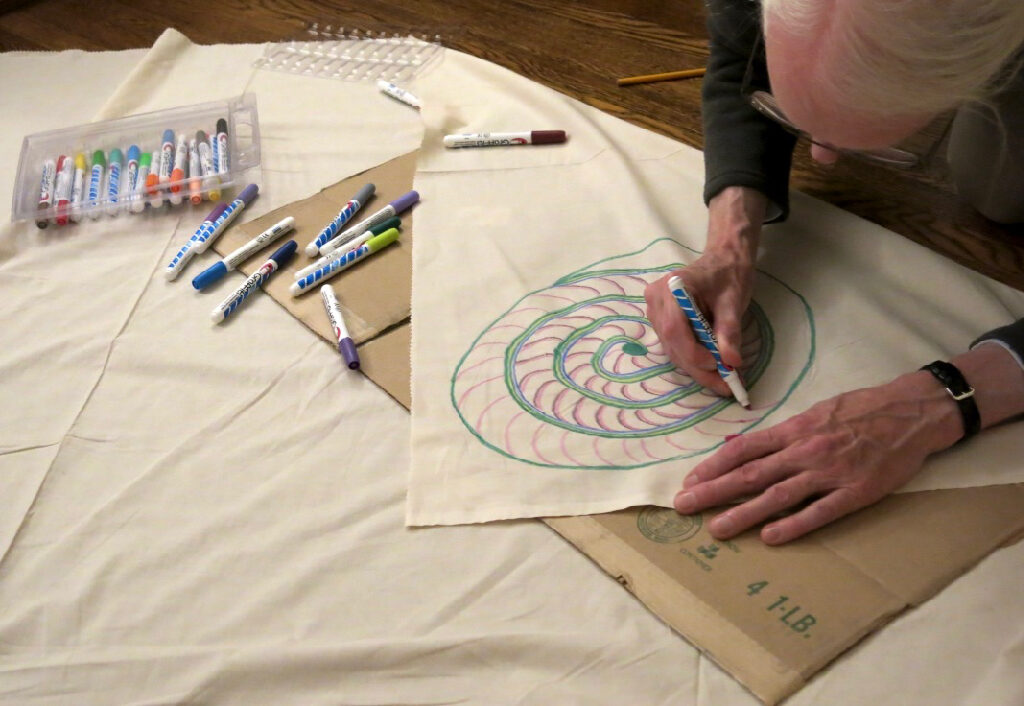
Tonight, Carol and I decided to play around with some materials and try a few things out. So we went down to Joanne Fabric and got 3 yards of 90 inch-wide unbleached cotton muslin, and a couple dozen different colored fabric markers. We wrapped Carol up in the muslin to see how much cloth was needed, and discovered that 2 yards of 110 inch fabric worked. (But if I were to do this again, I’d use a 90 inch square. And if I were making one for myself — Carol’s five foot nine inches tall, but I’m six foot five — I’d probably want a 110 inch square of fabric.)
Carol lay on the cloth diagonally. I flipped up the corner down by her feet first, folded over one side then the other side, and finally flipped the top corner down over her face. After flipping the corners back down, I used a pencil to make faint lines about where I folded the fabric; then when I started drawing, I knew about where to draw the designs.
Carol wanted to draw a face, but I said that would be far too difficult. Instead, she let me draw an abstract design within an oval shape:
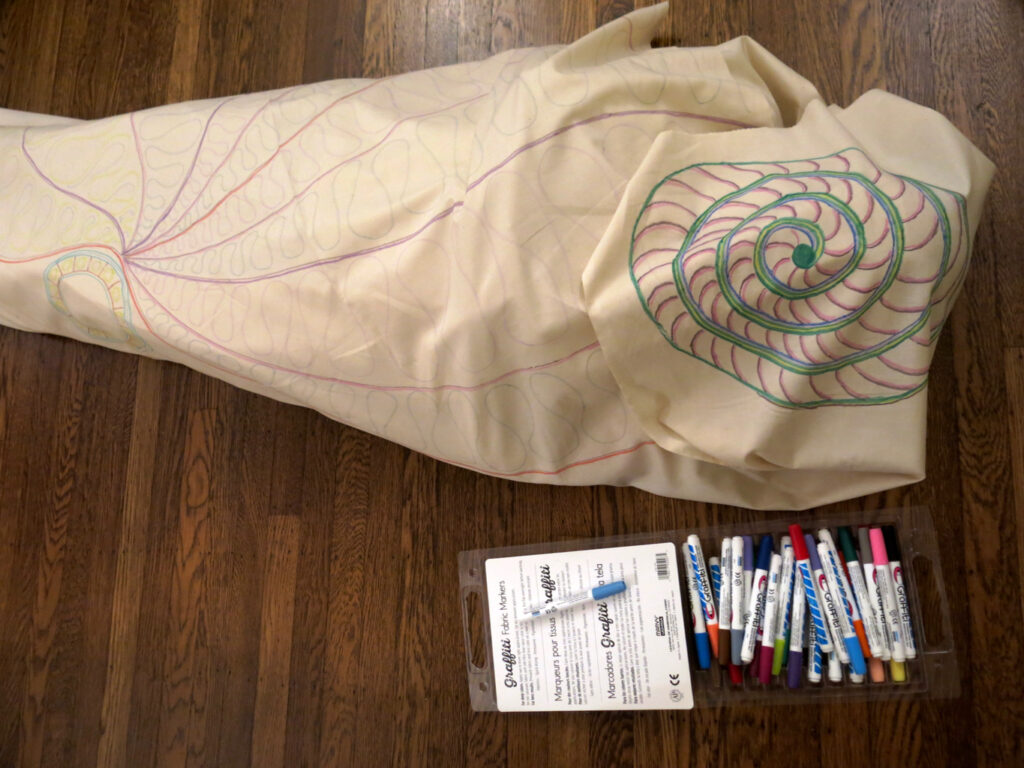
Next I drew a design on the final flap of fabric that would be folded over her body. Ultimately, I suppose you could draw designs over the entire piece of fabric. But most of what would be exposed would be those two flaps of fabric, as you can see in the photograph below:
(That took me about an hour. But I have excellent hand skills, and years of training and experience in making art; someone with less experience could easily take two hours to get that far.)
To complete the shroud shown in the photo, I’d use fabric paint to fill in the design — perhaps a light wash inside the drawing at the head, with a dark bold color outside it; and then a light wash inside and around the swirls in the part over the body. If I wanted a more carefully crafted shroud, I’d get another piece of fabric and hem all the edges, and repaint the design on the hemmed fabric.
Really, though, for me this isn’t about coming up with a carefully-crafted final product. It was very pleasant working with these materials, and it was a chance to reflect on — not on death so much as to reflect on the entire life cycle.
Cost: 90 inch cotton muslin is about US$8 a yard. A nice set of fabric markers is going to set you back $20-35. If you want to use paints, that will cost you about $3 per color (for good-but-not-expensive paints). If you want to try stamping or printing with dyes, expect to pay about $45 for a starter kit.
Registration is closed on the workshop, but if you contact Carol directly ASAP, she might be able to get you in.
Update: 1/13/22 — There are now two requests for this post in come other format (see comments). So I made a PDF version which should be easy to download. Just click on the link above, or the preview below.
Since I keep adding new material to this post, I added the internal navigation links on June 4, 2025.
Original post, July 11, 2019: The washtub bass
Steve lent me his washtub bass, so I could take it home and try to learn to play it.
Steve’s washtub bass is simplicity itself: a 15 gallon galvanized washtub with a hole drilled in the center of the bottom; a length of 3/16 inch braided polypropylene rope, and a broom handle with an eyebolt screwed in one end and a slot cut in the other end. Tie a stopper knot in one end of the rope, thread it up through the hole, and tie it to the eyebolt. Place the slot of the broom handle on the rim up the upturned washtub, pull the string taut, and there you are.
Playing the washtub bass is not so simple. You have to put one foot on the rim of the washtub to keep it on the ground. You adjust the pitch by changing the tension of the rope by tilting the broom handle back and forth. The range is pretty limited — I got less than an octave — and it’s a challenge to get exactly the pitch you want. The biggest disadvantage, though, is that playing it took a lot out of me: it’s a real workout to move that broom handle back and forth, and twanging the braided rope is hard on your hands. After half an hour, it became clear that it was going to take more time than I was willing to devote to building up strength and building up callouses.
There had to be a better way. I began researching other ways of building and playing the washtub bass.
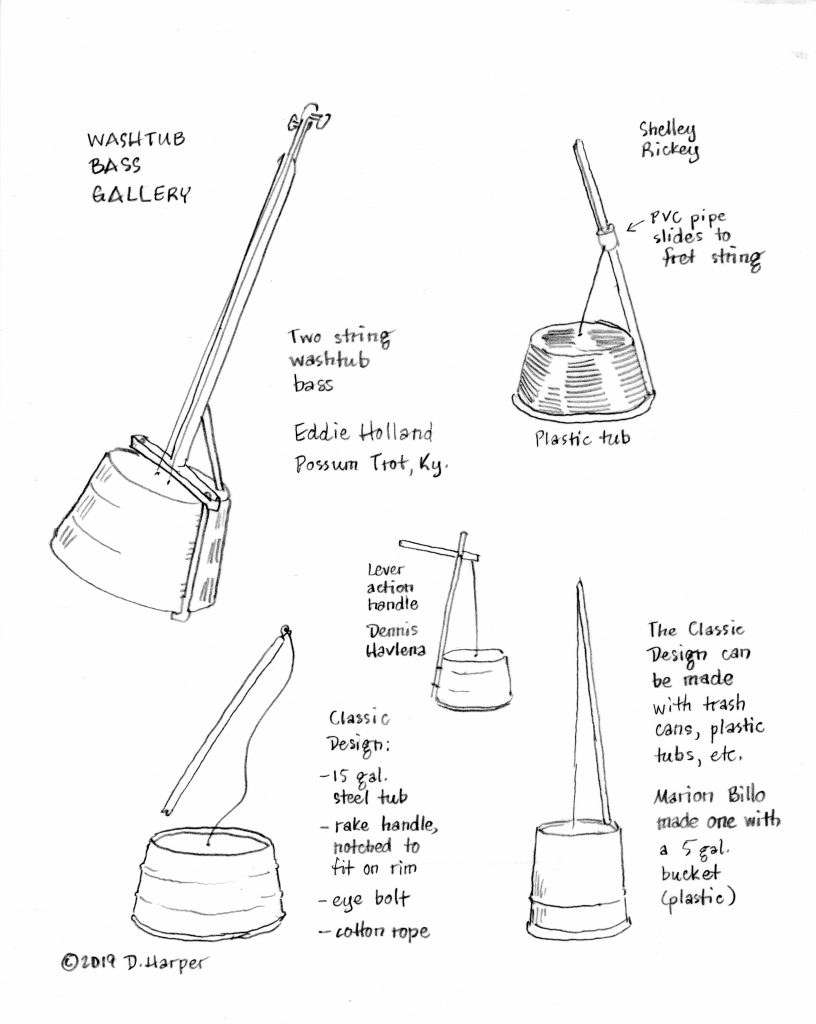
Eddie Holland of Possum Trot, Kentucky, built himself a two-string washtub bass with a fixed neck that you play by fretting, not by moving the neck. He’s a heck of a player, and his bass sounds great, but by the time you buy the hardware, the tuning machines, and a couple of strings for an upright bass, his bass probably cost a couple hundred dollars.
Shelley Rickey has a washtub bass made out of a big plastic tub with an arm bolted on the side; the string is fretted by means of a short length of PVC pipe that you slide up and down. She has a video where she plays cigar-box uke and her partner plays the bass, and the bass sounds good. But it still takes a lot of muscle: “I’ve been playing it now for five years,” Shelley writes, “and have developed the arms of a lumberjack.”
Dennis Havlena of Michigan devised a lever-action arm to reduce the muscle strain. Marion Billo shows plans for Joe Birdsley’s five-gallon (plastic) bucket bass with a special attachment for keeping it on the floor. But I don’t see that these offer much advantage over Shelley Rickey’s design.
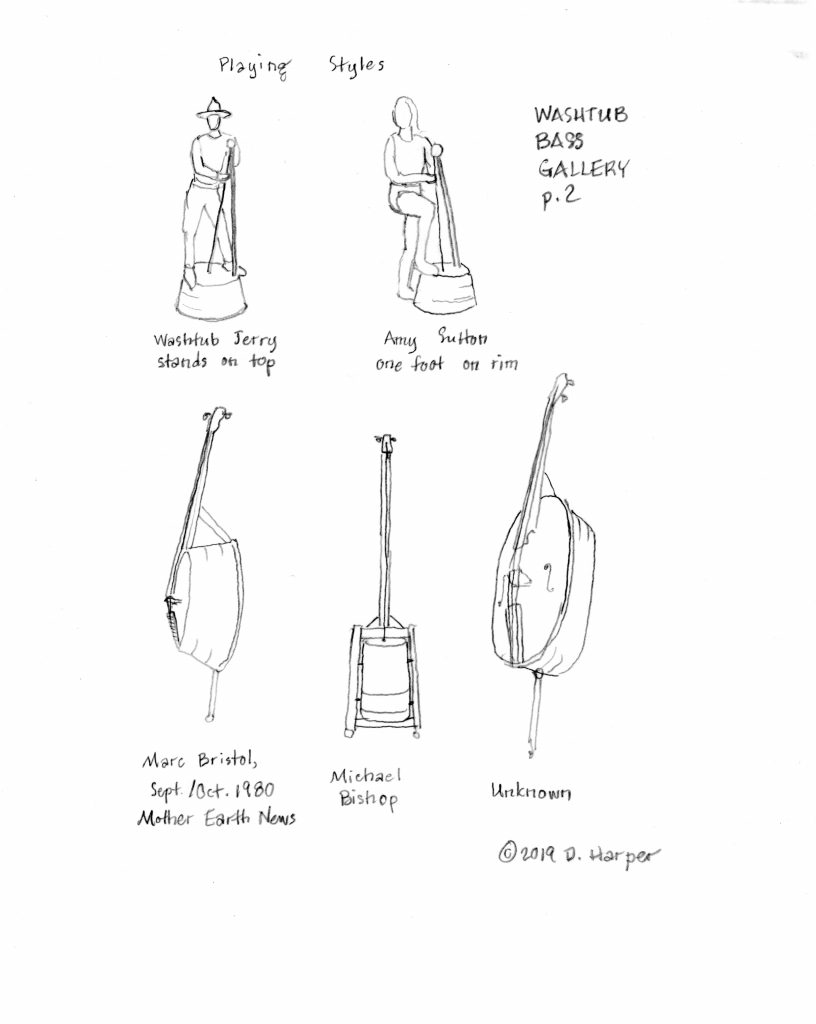
I found different playing styles, too. “Washtub Jerry” stands with both feet on the rim of the washtub; this brings the neck of the bass closer to his body, which might give him better control. I also found a photo of Amy Sutton holding down the rim of the washtub with a bare foot, which seems like it would be painful.
There are also more complicated designs for washtub basses where you don’t tilt the neck to play. Michael Bishop made a hardwood frame with a five-gallon bucket as the resonator, and a fixed neck and tuneable string. Marc Bristol, writing in Mother Earth News, September/October, 1980, issue, describes an elaborate upright bass made using a washtub as the resonator. I found a photo online of bass made on a similar plan, except the oblong washtub supports a wood sound board.
I guess if you really want an upright bass and you can’t afford a wood one, you could make one of these. But these really aren’t washtub basses; these are upright basses made in folk instrument style. The upright bass is an instrument in the violin family from Europe, but the washtub bass has roots in another continent. According to “Afro-American One-Stringed Instruments,” an article by David Evans in Western Folklore (vol. 29, no. 4 [Oct., 1970], pp. 229-245), the washtub bass comes from Africa:
“Two kinds of one-stringed instruments are known to Negroes in America today. One is the familiar one-stringed bass, sometimes called a ‘washtub bass’ or ‘gutbucket’ from the materials of its construction…. Its origin in the African ‘earth bow’ has been pointed out and generally accepted. This African instrument is made by digging a hole in the ground and covering it with a membrane of bark or hide, which is pegged down at the edges. From the membrane a string is led to a nearby sapling or stick placed in the ground. The string is then plucked, the covered hole serving as a resonator. In America an inverted washtub is simply substituted for the membrane and the hole.”
(The other one-stringed instrument is a “jitterbug,” which is a single string played in bottleneck guitar style; the jitterbug derives ultimately from the mouthbow).
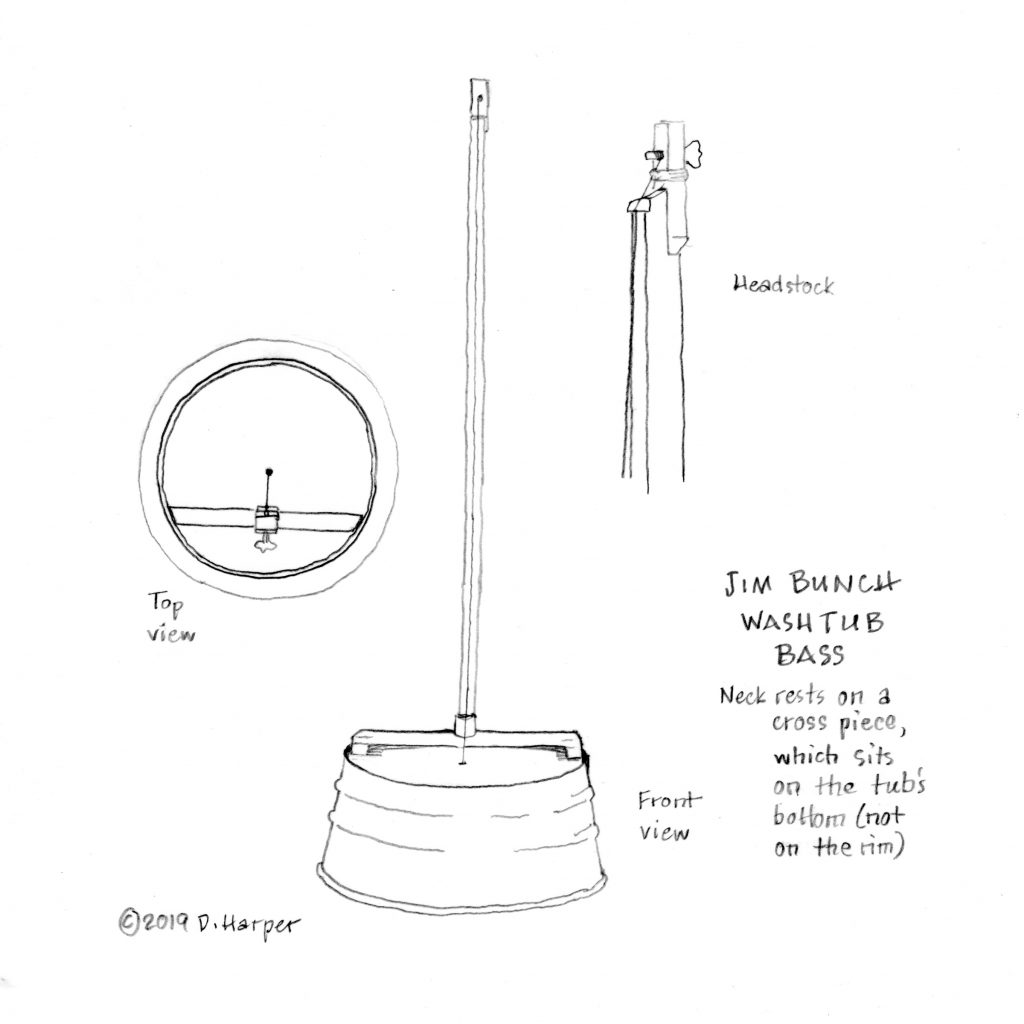
What I was looking for was a version of the washtub bass that didn’t require me to develop the arms of a lumberjack, yet retained the flexibility and character of the American version of the African earth bow. And what I found was the simple yet elegant washtub bass built and played by Jim Bunch. He describes his instrument as follows:
“I have built a cross brace for the pole using a board the width of the tub supported by two small blocks that fit on the rim. This allows you to support the pole closer to the center of the tub and get good notes without putting as much tension on the string and your fingers. [Moving the pole changes the string tension and the pitch, but] you can also move up and down the pole to change notes. I tend to both adjust the tension and finger 5ths when I play. I screwed a rubber table leg cover to the middle of the cross brace that the pole fits in. This allows the pole and brace to be disassembled for the trunk of the car.” (from the Tub-o-Tonia Web site, c. 2005?)
This keeps the simplicity of the instrument; all you’re adding is a cross brace. You can still change pitch by changing the tension of the string, but it requires a lot less arm strength. And you can fret the string up and down the neck (without having to slide a PVC pipe). Using some scrap wood I had lying around, I made my own version of this, and it’s really a joy to play.
Since Jim Bunch first described his instrument on the Tub-o-tonia Web site, he has made a few modifications (see this discussion for some details). He replaced the metal bottom of the tub with 1/4 inch thick Lauan plywood; for strings, he upgraded from a 3 dollar bike derailleur cable to an upright bass woven-core G string (perhaps 50 dollars). Photos of his instrument reveal that he’s added a headstock with a nut to hold the string a bit off the finger board, as well as a tuning machine. These somewhat elaborate modifications make sense for him because he plays a lot, and he plays at a pretty high level, as you can see from his Youtube videos.
I’m not trying to perform at Jim Bunch’s level, but I feel his type of washtub bass — with the neck supported on a cross brace — is the best bet for an occasional player like me. After a couple of hours of practice, I’ve gotten good enough that I’ll be able to play in tune on simple songs at a low-key folk music jam session. And that’s all I want.
Addendum (July 12, 2019)
Details of my additions to Steve’s washtub bass: I took his washtub, replaced the line (it was rough and worn and hard on my fingers), and added a neck with a Jim Bunch style cross brace. I made the neck out of scrap wood (including a discarded floral tripod that I found in the cemetery’s trash). The string is a new piece of 3/16 inch braided polypropylene rope, which I’ve tuned roughly to D, a good tuning for many simple folk melodies. The string is tied off with figure-eight knots (a stopper knot that’s relatively easy to adjust for tuning). And Steve’s original mop handle and string are untouched, so I can return his instrument to him just the way he gave it to me. The photo below gives an idea of the most important dimension for the Jim Bunch style washtub bass — the distance between the neck and where the string is attached to the washtub. And in a comment, Carol has added a photo of the washtub bass in action at our jam session.
Update #1 (Aug. 9, 2019): The Lance Richmond washtub bass
I’m adding sketches of Fritz Richmond’s washtub bass to this post. Richmond played washtub bass in the Jim Kweskin Jug Band, and played washtub bass with popular musicians from Maria Muldaur to Loudon Wainwright to the Grateful Dead. One of his washtub basses is in the Smithsonian. In short, Richmond is probably the most famous of all washtub bass players, so his bass and his style of playing are worth looking at. A few things I noticed: First, the neck of his bass has a metal lower part and wooden upper part; it looks like it can be broken down for easier transport. Second, videos of Richmond’s playing style show that he both moved the angle of the neck and fretted up and down the neck. Third, he uses a metal nut, which in photos looks like it’s a section of a metal guitar slide. It’s also worth noting that Richmond used a special leather-and-steel glove for fretting, and a large pick for strumming.
Update #2 (Nov., 2023): Making a Jim Bunch-style washtub bass
A couple of months after I wrote this post, I built a brand-new washtub bass from the ground up. I used Jim Bunch’s basic plan, as shown above. I decided to spend some money, with a total cost of about $150. (And yes, I returned Steve’s washtub bass to him.)
Materials list, with approx. 2019 prices:
string: steel G string for an upright bass (~$30)
tuner: tuning machine for a bass guitar (~$60 for set of 4)
nut: piece of birch I had lying around, attached to neck with brass screws
washtub: Behrens 15 gallon hot-galvanized tub (~$40)
neck: 2×2 redwood (~$10)
cross brace: birch boards I had lying around (free)
metal angle braces to hold the neck on the cross brace
Construction notes:
While Jim Bunch said he used a bike derailleur cable successfully, the one I tried was not satisfactory. So I bit the bullet and bought an actual bass string.
My first build did not include a tuner. However, after playing once or twice I realized that a tuner would allow me to set the string tension so I could use my preferred neck angle. It’s not necessary, but I felt it was well worth the money.
I cut several nuts before I got one that held the string just the right distance away from the neck — not so far that it was hard to finger the notes, but far enough to get a good clean sound. The brass screws allowed me to experiment with different nuts (as opposed to gluing in a nut).
I chose the Behrens hot-galvanized washtub because it was sturdier. Some of the cheap washtubs looked like they’d crumple after a couple of hours of playing with your foot pressing down on them. It is essential that you remove the handles on the side, because they’ll vibrate audibly when you play (I learned this the hard way).
I made the neck out of redwood because that was the cheapest 2×2 clear, straight lumber I could find at the lumber yard that day. It was actually graded as construction grade, but I found a six foot length that was clear of knots. My only concern with using redwood for the neck is that it can produce massive splinters; I carefully rounded the corners to reduce that possibility.
I used birch for the cross brace because that’s what I had lying around. Any strong wood clear of knots would do equally well.
The hardest part of the build was getting the cross brace to sit the correct distance back from the hole where the string attached. I had to adjust the cross brace several times to get that distance exactly right.
You could build this bass for well under a hundred dollars. First, find a friendly luthier or guitar repair shop that would sell you just one tuning machine. Second, find a used washtub. Third, scrounge the wood rather than buying it new. However, I would definitely spring for the upright bass string; it sounds so much better than anything else I tried.
Playing the bass, and its eventual demise
Once I finished adjusting the cross brace and the nut, this washtub bass played like a dream. Just like Jim Bunch says, you can adjust the pitch by moving your fretting hand up and down, or by pulling the neck back. I got most of my notes by fretting, but pulling the neck back was also useful — not only could I get four or five notes by pulling, I could bend notes or produce accidentals. When the guitarists at the jam session decided to capo up from the key of C to the key of D, all I had to do was put a little more tension on the neck and fret in the same positions for both keys.
The hardest part of using the bass was transporting it. I could remove the cross brace. But the neck was attached to the washtub by the string, so I had to balance the neck on the tub while transporting. To protect the neck from scratching, I wrapped it in old shirts, but I was always worried about damaging the string.
I had fun playing the bass in our twice-monthly jam sessions. I started out just playing the 1 and the 5 of the chord, one or two notes per measure. But gradually I got to where I could add some quarter note bass runs, and even some more interesting rhythms. I used a pencil to lightly sketch in a couple of fret markers on the side of the neck: one at the first octave, and one at the first fifth — the equivalent of fret twelve and fret seven — this proved to be very helpful. Accurate intonation was the hardest part of learning to play the washtub bass. I practiced for hours at home playing along to recordings in order to develop acceptable intonation.
The volume of this instrument was adequate for a non-amplified jam session; to increase the volume, I usually raised one edge of the washtub an inch or so (a piece of firm rubber worked well). After I switched to a real bass string, the sound was quite good: smooth with good attack when plucked. The people I played with tolerated me, and even complimented me once or twice.
Then COVID hit, and I put the bass away. When we moved across the country in 2022, we had to get rid of a lot of stuff, and sadly the bass was one of the things that had to go (mind you, I kept the 2 mountain dulcimers I built or rebuilt, a guitar, a ukulele, and some smaller instruments). Equally sadly, I never took a photo of the bass.
Someday I’d love to have another washtub bass. Alas, our new apartment is too small. But I still have the neck and the cross brace…maybe some day….
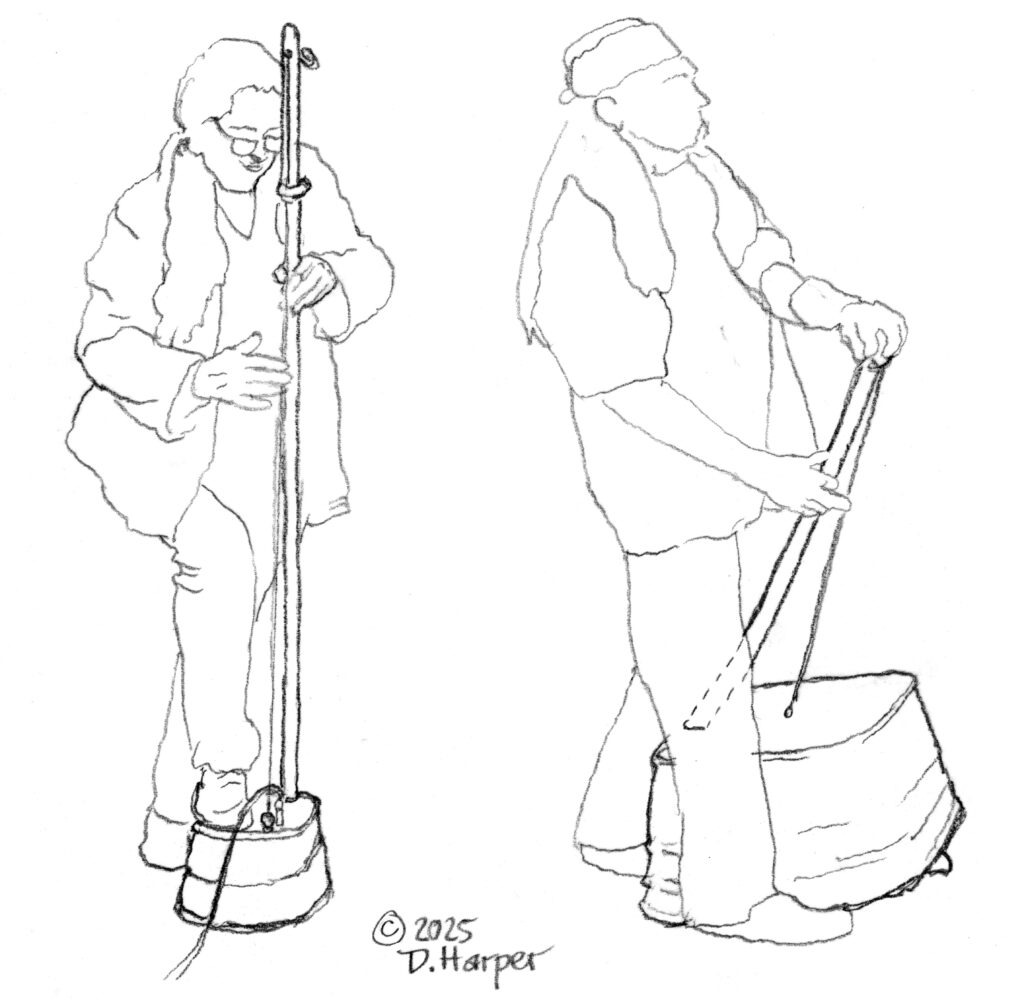
Update #3 (June 4, 2025): Two electric washtub basses
Two washtub bassists have left comments drawing attention to their electrified instruments. I watched them both on Youtube, and made sketches from the videos.
Steve “Boomboom”Brownstein is shown at right. Reading his description of his instrument, then looking at the videos on his band’s website, you can get a pretty good idea of how his instrument works. There’s a bracket (made with a hinge) extending from the washtub out to where he can stand on it, thus securing the instrument. This means he can stand with both feet flat on the ground. The front edge of the washtub is slightly elevated to allow sound to come out. Steve plucks the string with his right hand, and adjusts the angle of the neck with his left hand. He wears a work glove on his left hand.
Steve attached a Barcus Berry pickup to the neck. No details on the type of string used. Steve writes: “FYI the string I pluck is fishing stringer, purchased at Walmart. It costs about $2.79. It is very similar to clothes line in diameter, but has an elasticity that clothes line doesn’t. I thread the line thru a door stopper in the center of the tub. This prevents the string from being cut by the sharp edges of the hole.”
Best of all, the instrument sounds good. (When you check out the videos of his band, it can be tough to pick out his bass from the rest of the instruments; I recommend wearing headphones.). I like the way Steve’s bass reduces the physical strain on the player, while retaining a good sound — the bracket is an idea other washtub bass players might want to look into. And I love the overall simplicity of his instrument, which is very much in the washtub bass tradition.
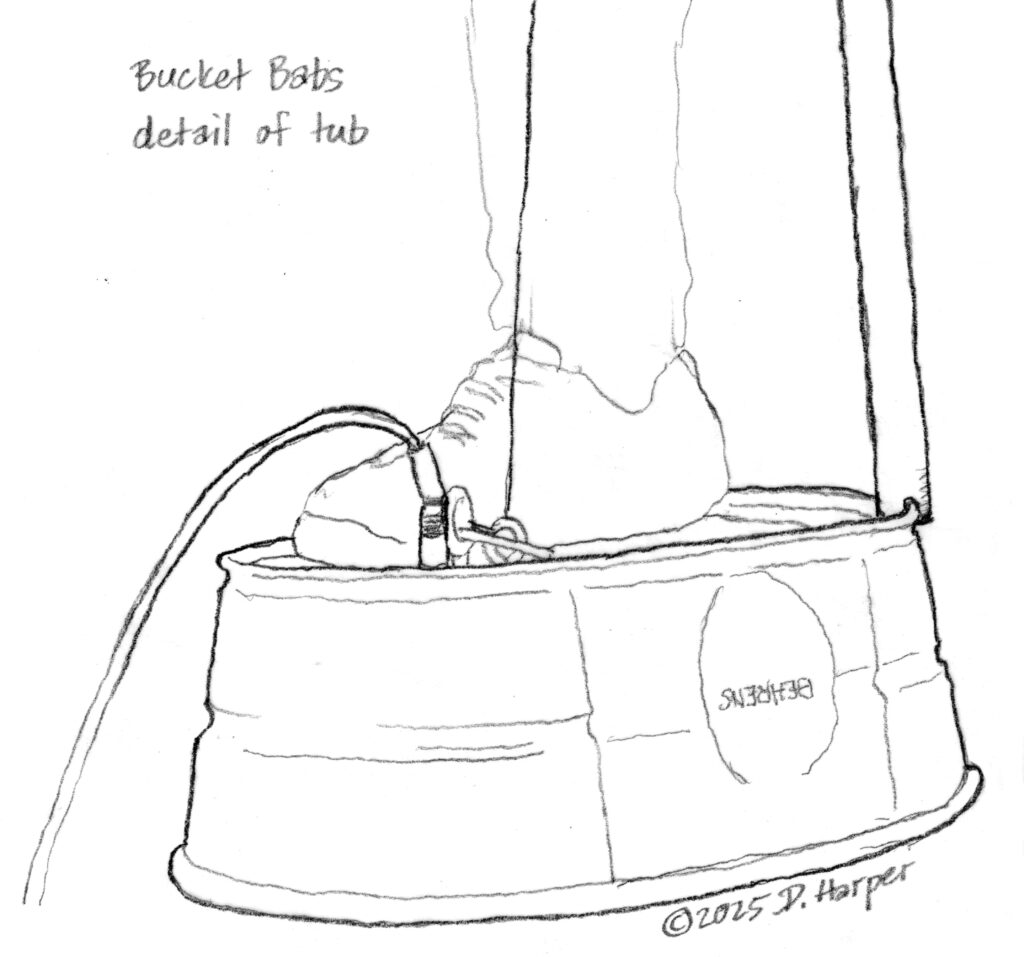
The electric washtub bass made by Barbara LePine, a professional washtub bass player whose stage name is “Bucket Babs,” is shown at left in the sketch. She writes: “I play a Behrens oval tub with guitar jack inputs, vintage Traynor bass head with a set of effects pedals, a simulated cat gut string and high quality broomstick handle.”
Despite the relatively small size of the tub, she gets a nice sound out of her bass — let’s face it, the amplification means she doesn’t need a big tub. And the small size makes the instrument that much more portable. Plus, the amp and the effects pedals allow her to adjust the sound as needed.
This looks like a pretty sophisticated instrument, so let’s dig into some of the construction details. The handle is a broomstick with a conventional notch in the tub end, which fits neatly over the edge of the tub. A bracket clamps the string about four-fifths of the way up the neck — not sure why Barbara does this — then the string goes through a hole and is attached on the opposite side. At the front of the washtub, I can see three fittings drilled into the tub: a connection for the mic jack, and two eyebolts. It looks like the string comes down, runs through one eyebolt, and then is attached to the second eyebolt — but I’m not sure why there are two eyebolts.
On the washtub, notice how the neck, the string attachment, and the mic jack are on the player’s left — leaving the other side for a foot to hold the instrument in place. This makes for good ergonomics. With a pickup, there’s no need to elevate the front edge of the tub to let the sound out, and Bucket Babs keeps hers flat on the ground, thus providing more stability — again, good ergonomics. I have no information about the type of pickup used [see below]. The effects pedals are clamped to a mic stand, and she uses her hand to activate them (obviously, she can’t use her feet).
Watch videos of Bucket Babs playing — here, here, and here — to get a better sense of how this all comes together. Looks to me like Bucket Babs is angling to be the next Fritz Richmond.
Addendum, June 5: Barb LePine sent me email with details of her washtub bass construction (very lightly edited):
“You mentioned my clamp on the string about a third of the way down. I use it to bring the beginning of the string closer to my hand, allows for leverage when playing higher notes, as well as playing with one hand while I push the buttons on the effects pedals. I prefer to play without gloves for best tone. The pickups are simple Piezo discs, carefully embedded underneath near the eyebolts. I cannot take credit for building this bucket — musical partner in crime Guitarist Porter McClister is the mastermind builder of this highly technical instrument. To me, it is the finest electric bucket known to man. I chose the oblong bucket to fit in a carry-on bag, a night before we were to fly to a show in San Francisco last year. It was originally the Little Giant brand, then switched brands to the more sturdy and slightly more compact Behrens tub. The stick travels in a shipping tube 4 inches wide and 58 inches long, sized exactly to airline regulations. Porter is an expert with string tone, he is legendary in Nashville. The double eyebolt is quite effective at keeping the string in angled position to lessen unwanted buzzy tones, cuts down on string breakage from rubbing. This washtub has a range of about an octave and a half of good notes. I also have an extra pickup under my right foot, allows me to play drum taps with my heel.”
June 4, 2025: When I added this update, I also cleaned up the rest of the post, and added two or three small items here and there.
Update #4: The tumbandero
In a comment on this post, musician Axel Rodriguez describes the tumbandero, the version of the washtub bass that he knows from Puerto Rico. I emailed him to thank him for the comment, and in return he sent links to 11 videos of tumbanderos and related instruments.
For some time, I’ve been thinking about making a lightweight portable stove that burns biomass instead of fossil fuels. Search the Web, and you’ll turn up lots of plans for such stoves — tin can rocket stoves, Canadian candle stoves, etc. But most of the plans I looked at seemed overly complicated and not particularly elegant. Then I stumbled on a video titled “How To Make a Wood Gasifier Stove”: it showed how to make a stove that was simple, even elegant. So tonight I made one.
The basic principle for the “wood gasifier stove” is the same as for a rocket stove: the solid biomass fuel (wood) burns at the bottom of the stove, with another combustion area higher up where rising gases are enabled to burn further. This is supposed to extract more heat from the fuel, and additionally the more complete combustion should result in less crud going into the air and into your lungs. However, where the rocket stove has been tested for greater efficiency by scientists, I know of no such studies for this design; we’ll just take it on faith that this design is probably more efficient than an open fire.
The biomass-burning stove with a fire in it
The stove requires two “tin” cans, one larger than the other: I got a 15 oz. can of pears, and a 29 oz. can of peaches. The smaller can, nested inside the larger can, is where you build the fire. Ventilation holes at the bottom of the larger, outer, can line up with ventilation holes at the bottom of the smaller, inner, can. The smaller can also has a row of ventilation holes near the top; this is where additional air is injected so to make rising gases can burn. If you look carefully at this photo of the stove I made, you can see the upper ventilation holes, with jets of flame coming out where the injected air is igniting rising gases.
Upper ventilation holes in the lit stove
I completed the basic stove in about an hour (including the time it took to eat the pears). The stove is reasonably practical, particularly for car campers or ordinary backpackers (i.e., not those crazy ultralight backpackers). And the stove is environmentally responsible: it’s made with recyclable materials, and it burns biomass instead of fossil fuels like white gas, butane, or propane. Plus, since it’s homemade, it doesn’t feed consumer consumption; and consumerism is a major contributing cause to the pending global environmental disaster.
I still have to make a potholder, to keep the cooking pot a couple of inches above the flames, where the greatest heat should be — but I have to wait until I eat another can of pears. Once I get the potholder made, I’ll post a photo showing something cooking on the stove (and I’ll add a sketch showing how to make one).