
A week-long event called “Reimagine End of Life” is taking place in San Francisco right now. As a part of this, Carol and Ms. M. will offer a workshop on Saturday called “It’s a Wrap: Design Your Own Burial Shroud.” The point of the workshop is not to make the actual shroud you’re going to be buried in, but to start thinking about a design for something that you’d like to be wrapped up in after you die.
Tonight, Carol and I decided to play around with some materials and try a few things out. So we went down to Joanne Fabric and got 3 yards of 90 inch-wide unbleached cotton muslin, and a couple dozen different colored fabric markers. We wrapped Carol up in the muslin to see how much cloth was needed, and discovered that 2 yards of 110 inch fabric worked. (But if I were to do this again, I’d use a 90 inch square. And if I were making one for myself — Carol’s five foot nine inches tall, but I’m six foot five — I’d probably want a 110 inch square of fabric.)
Carol lay on the cloth diagonally. I flipped up the corner down by her feet first, folded over one side then the other side, and finally flipped the top corner down over her face. After flipping the corners back down, I used a pencil to make faint lines about where I folded the fabric; then when I started drawing, I knew about where to draw the designs.
Carol wanted to draw a face, but I said that would be far too difficult. Instead, she let me draw an abstract design within an oval shape:
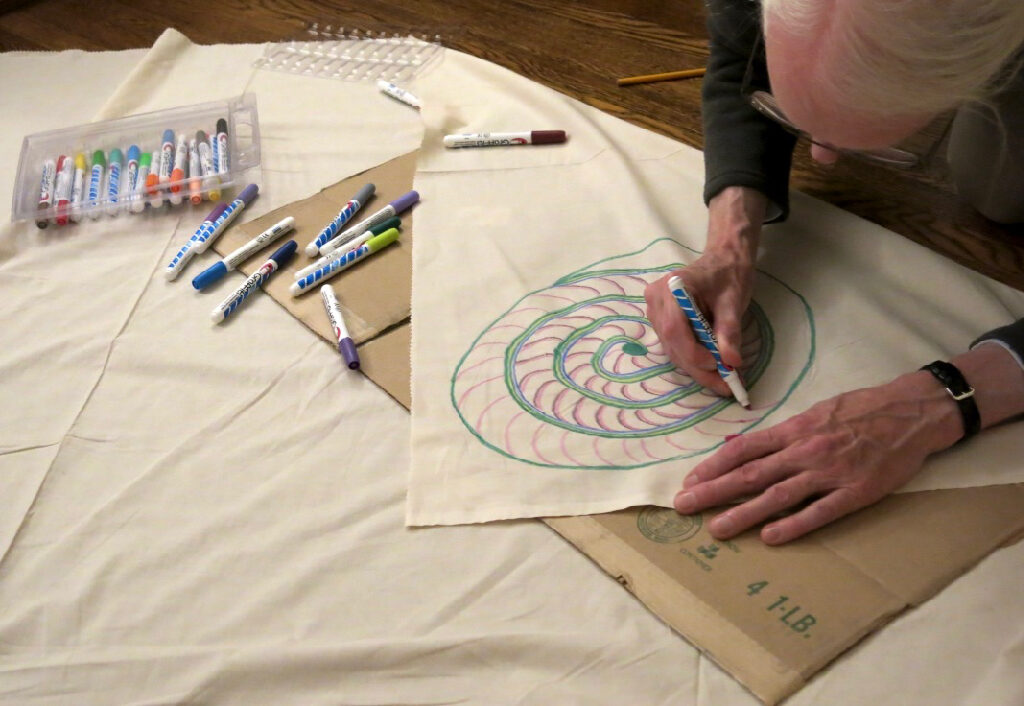
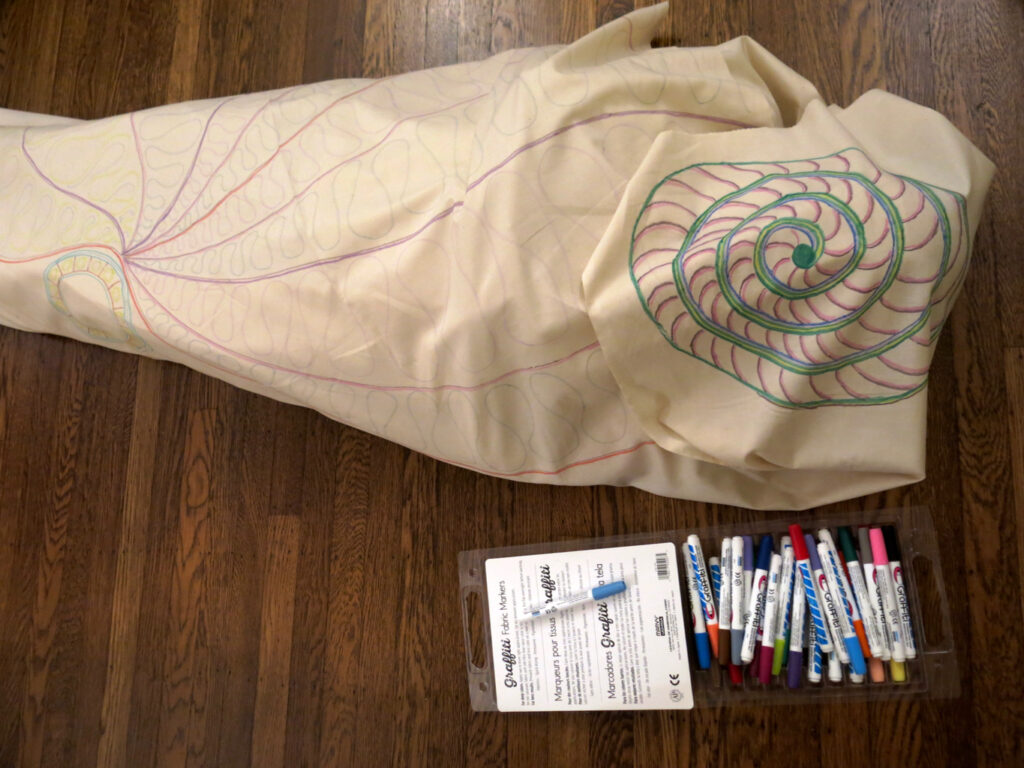
Next I drew a design on the final flap of fabric that would be folded over her body. Ultimately, I suppose you could draw designs over the entire piece of fabric. But most of what would be exposed would be those two flaps of fabric, as you can see in the photograph below:

(That took me about an hour. But I have excellent hand skills, and years of training and experience in making art; someone with less experience could easily take two hours to get that far.)
To complete the shroud shown in the photo, I’d use fabric paint to fill in the design — perhaps a light wash inside the drawing at the head, with a dark bold color outside it; and then a light wash inside and around the swirls in the part over the body. If I wanted a more carefully crafted shroud, I’d get another piece of fabric and hem all the edges, and repaint the design on the hemmed fabric.
Really, though, for me this isn’t about coming up with a carefully-crafted final product. It was very pleasant working with these materials, and it was a chance to reflect on — not on death so much as to reflect on the entire life cycle.
Cost: 90 inch cotton muslin is about US$8 a yard. A nice set of fabric markers is going to set you back $20-35. If you want to use paints, that will cost you about $3 per color (for good-but-not-expensive paints). If you want to try stamping or printing with dyes, expect to pay about $45 for a starter kit.
Registration is closed on the workshop, but if you contact Carol directly ASAP, she might be able to get you in.
Update: 1/13/22 — There are now two requests for this post in come other format (see comments). So I made a PDF version which should be easy to download. Just click on the link above, or the preview below.
Dan, one CAN design and make the actual shroud at this workshop. It is up to them whether the muslin and the markers are enough!
Oops, what Carol said!
I am looking for some kind of “pattern” to make my own green burial shroud. I was unable to copy your article and would so appreciate it if you could send me a copy. I am artistic and creative and would welcome the means to make this final personal statement.
Many thanks
I alao am looking for some kind of “pattern” to make green burial shrouds for myself and my husband.. I was unable to copy your article and would so appreciate it if you could send me a copy
I would also like a pattern for a burial shroud.
Nancee, we have really have no pattern for the shroud. We did absolutely no sewing. Just wrap as shown in the instructions above.
Thank you very Much for this information.
I’m wondering how you secured the wrapped fabric.
I’m wanting to crochet one and so I’m thinking to make it 110/120 inches and then doing a light felting of it to strengthen the fabric. What I’m curious about is how to strap the body in?
What did you do?
I have bought myself a green burial plot and I’m doing my best to survive third fourth stage breast cancer and so in the meantime I’m wanting to create my own death shroud.
Sincerely, Jamie JJ
Jamie, I haven’t done this with an actual body, but as I understand it, you don’t need to strap the body in. Certainly that was my experience when we did the sample shroud. When I wrapped my partner in the shroud, the friction of the fabric against fabric kept it pretty secure. In some cases you’ll want to sew the shroud shut, which could also be a very loving way to say goodbye to the body, very hands-on way to say goodbye.
Based on doing this with a live body, here’s what I think will work best: (1) Lay out the shroud face down. (2) Carefully lift the body onto the center of the shroud; check to make sure the face panel (if you have one) will wrap up over the body’s face, and if it doesn’t, gently reposition the body so that it does. (3) Unwrap the face panel, then bring up the other side of the shroud, tuck it over the body, and under if necessary. (4) Wrap the face panel so it’s centered over the face, tuck in flaps at head and feet, and if you’re stitching it now’s the time to stitch shut. (5) Gently lift the body into the coffin (if you’re using a coffin), or if you’re not using a coffin lift it into whatever you’re using to transport the body to the burial location. If there’s no coffin, consider stitching the shroud together to make transportation possible. Dead bodies are awkward to lift and carry, and a stitched shroud would make it much easier to handle respectfully.
If you’re doing a green burial, be sure to use natural fiber thread. Most sewing thread contains polyester, and I’ve had real difficulty sourcing 100% cotton thread. But I have found sources on eBay. Recently on eBay, I was able to purchase 60 yds of Coats & Clark’s “Darning Cotton,” which is basically a heavy thread that will be very suitable for sewing shut a burial shroud. 60 yds. should serve for both my partner’s and my burial shroud.
Traditionally, those preparing the body for burial would wash the body first. So if you’re putting a design on the shroud using markers (as shown above), make sure you know if the ink is water soluble!
And Jamie, I LOVE the idea of a crocheted shroud. For sizing, it probably makes senses to lie down on a piece of fabric, and have someone wrap you, so you know what will make a good size. Since I’m 6 foot 5 inches tall, that’s going to be a key consideration for me, making sure I size the fabric correctly! But this is equally an issue for small people, because you don’t want so much fabric that you’re going to have to wrap the body more than twice around, that would be really awkward.
I’m hoping to do a follow up post. I want to get a group of people together and take photos of how you can size a shroud, then then how you can wrap the shroud around a body respectfully after death. If I do a follow-up post, I’ll put it in the comments here.
Finally, Jamie, I’m sending healing thoughts and prayers to you.
Making a shroud is only the start and that is what I have achieved in a workshop with Michelle and Leith in Fremantle Western Australian. The shroud has enabled me to have that death conversation with my family and friends, I’m not in a hurry to get there but it will be very different event when it does come. Don
I am so glad to find this discussion. I have had the idea of making a home made shroud with a group of people for several years. Story telling and end of life wishes will be shared, of course. My friend and I made a linen shroud for her dog. We used three sashes. I think it would work for a human body also even though it requires more cutting and sewing. One sash at the feet, one at the waist and one around the shoulders would work. I think the sashes will help secure the shroud for future transfers of the body.
Jane, thanks for the idea of using sashes. That seems like an excellent addition.
Thank you for this information. I am planning human composting in Seattle. I live in Western New York where composting is legal but so far there is no facility. I have family in Seattle who could attend a service and receive a portion of the compost. With the info here I’m going to start planning my shroud. Thanks again.
Many thanks for your story and experience in making a shroud. As I face my final months with brain cancer at 45, I have Tennyson poetry and several other “hippie” ideas (I live in the farmland of Illinois which is very conservative) However, as a land owner you may be buried on your land here. Though I have been divorced from my children’s father for 15 years, I’d like to use my satin wedding gown as part of my shroud. Any suggestions are greatly appreciated. I realize this is an older post for the two of you but I’d love any advice on how to use a part of my wedding gown as a shroud. Many thanks for sharing your story and I pray that you both have the beautiful, natural burials you deserve. We humans don’t need the high priced embalming, caskets and vaults. Our bodies lived naturally and they shall rest naturally.
This is a lovely example of figuring out green burial shrouds. I had planned on using a quilt that was made for me because of the symbolism, but since it is such a useful item, with lots of labor sunk into making it, now I’m thinking of a simpler shroud, sewn shut. I think one consideration is that the fabric be opaque, for the sake of family doing the burial. In our local green cemetery we use straps to lower the body on a wooden backing board. I like the idea of making them in a group together. KRISTIE: I wish you well. You might consider using the satin fabric for sashes to tied the shroud. I’ve seen simple sashes and others that were sewn on the shroud and lace up like a shoe laces, like a medieval dress bodice.
I sew. I rarely throw out anything made of fabric. Consequently I have several worn out bed sheets, both cotton and linen. I have always found the borders, say about 15″ wide, to be strong and good for other uses. It is the center that is generally very weak, so often I shred it to fill pet beds. Now I realize that I can piece some of these centers to create my shroud! I like the idea of repurposing for the big sleep a sheet I have slept in during my life. I think I should make a gown (in case the surviving family wish for a viewing or wake) as well as a shroud.
Joaquina, what a great idea! Thank you for posting it here.
As a weaver I have accumulated far too much fiber, yarn and thread over the years. Next month I will begin spinning and weaving burial shrouds for myself and my husband using up much of that material. I plan to make some ties. I will also create a pouch to put a wooden board in the back making burial easier. This will certainly be a large project but think it a great way to spend some time in late 60’s, hopefully well before we need the shrouds.