I wrote this post while I was experimenting with cyanotype as a way to get people to look more closely at plants. I updated it several times, with the final revision on 21 August 2025.
(Updates: 30 May; 12 July 2025; 17 July; 20 July 2025. Final revision, 21 August 2025.)
Cyanotype books
Many of the books on cyanotype available online are self-published. The following two books come from reputable publishers.
Cyanotype: The Blueprint in Contemporary Practice by Christina Anderson (Focal Press, 2019), covers everything you need to know about cyanotypes — setting up a “dim room”; how to coat your own cyanotype paper; recipes for classic cyanotype, new cyanotype, and other formulas; how to tone prints; and more. Anderson tested over 100 different papers to see which worked best for cyanotype, and there’s a whole chapter on paper. The last chapter of the book showcases artwork by contemporary cyanotype artists. This is a must-have book.
Cyanotype Toning: Using Botanicals To Tone Blueprints Naturally by Annette Golaz (Routledge, 2021) is an excellent introduction to toning cyanotypes using plant materials. Aimed at the proficient cyanotype artist, Golaz shows how to achieve a wide range of colors that take you far beyond the typical blue cyanotype.
Cyanotype supplies
Chemistry
Jacquard Products sells cyanotype sets — two plastic bottles with cyanotype chemicals that you fill with water, then mix the resulting solutions 1 to 1 when you’re ready to coat your paper. (I bought mine at an independent art supply store, and it was super easy to use.) I also bought a Jacquard kit which included chemicals, brush, glass plate for contact printing, and some Hahnemuhle Platinum paper — it’s probably overpriced, but I found the kit helped me get started.
Bostick and Sullivan is the major supplier of alternative photographic processes. I have not ordered from them, but they have everything you need for cyanotypes. Other sources for cyanotype chemistry include Photographer’s Formulary, The Cyanotype Store, and Fotospeed.
Paper
Finding paper that’s good for cyanotype can be a challenge, since not only must the paper stand up well to repeated wetting, but the pH of the paper is also important. See Christina Andersons’ book for comprehensive information on papers.
One of the inexpensive papers Anderson recommends is Canson XL Watercolor paper. This is currently my go-to paper, and I can recommend it. Widely available at places like Michael’s and Dick Blick.
Both Anderson and Golaz say Hahnemuhle Sumi-e is an excellent lightweight paper to use in cyanotype. I got mine at the Art Mart in Portland, Maine, which stocks it. Or, Bostick and Sullivan sell Hahnemuhle Sumi-e online. It requires gentle handling, but produces beautiful results.
At a week-long summer art workshop, three of us loved Fabriano Medievalis paper. It’s slightly cream-colored, which sets off the Prussian blue of the cyanotype nicely. However, it does not stand up well to toning, or long wash baths.
I’ve also used Yasutomo “Sketch,” which produces similar results to Hahnemuhle Sumi-e, but is much less expensive. However, it’s very fragile in water and tears easily during the developing process — you can forget about bleaching and toning this paper. If you’re on a budget and very patient, maybe give it a try.
Cyanotype in the classroom
Lawrence Hall of Science sells “Sunprint Kits” with 12 pieces of 4 inch square cyanotype paper and a clear acrylic overlay sheet. Cost buying direct from them is US$5.99 per kit (do not buy from Amazon where the price is higher). This cyanotype paper develops quickly and requires little water to develop — perfect for classroom use. They also sell refill packs of 12 sheets of cyanotype paper for US$3.99, as well as 8-1/2 by 11 inch cyanotype paper. The kits and refills are ideal for class use — inexpensive enough to allow people to experiment.
My younger sister the children’s librarian uses 5×7 inch “Nature Print” cyanotype paper from Dick Blick. It’s just as good, but I’ll stick with the Lawrence Hall of Science paper, because my purchase helps support their science education mission.
Cyanotype websites
Many of the cyanotype websites appear to be “AI”-generated slime. Others are too basic (“Expose the cyanotype paper, put it water, look at the result!”). But I found the following websites to be worth a look.
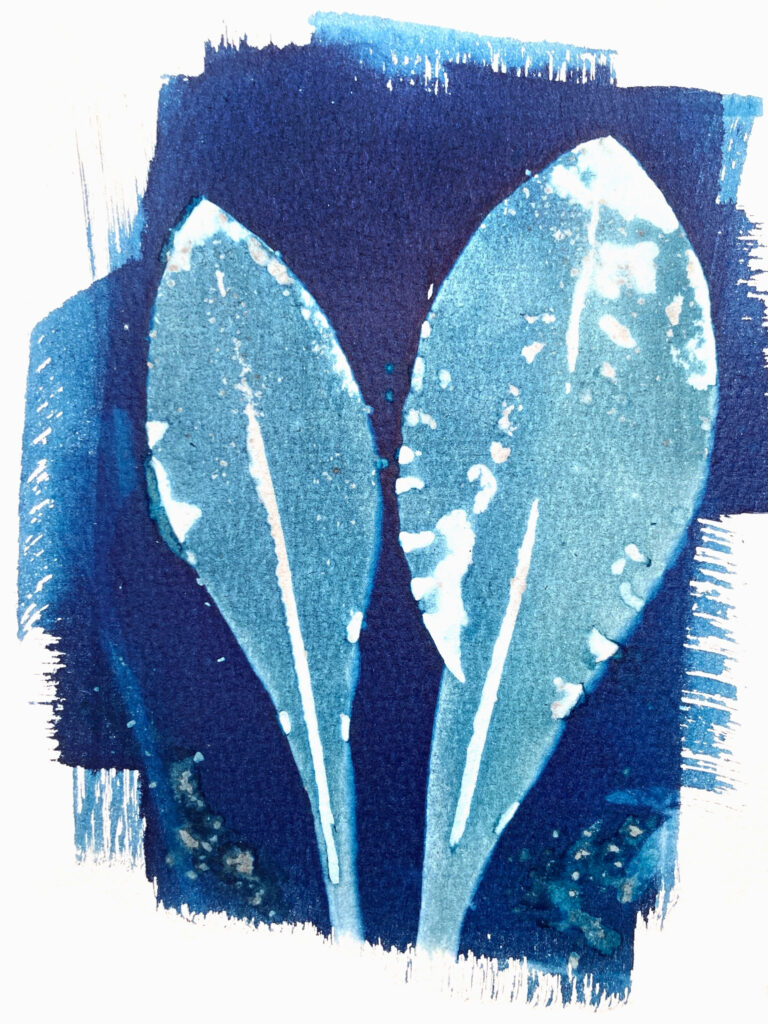
Cyanotypes with plants
Cyanotype by Angela Chalmers, a PDF, gives instructions on making cyanotype photograms using plants. Great ideas, and the author’s photograms are gorgeous.
“How To Make Cyanotypes of Flowers” on the Nature TTL website includes very useful instructions on a specific form of wet cyanotype process.
A digitized version of Anna Atkins’s book of botanical cyanotypes is online at London’s Natural History Museum website. A scholarly article with an analysis of Atkins’s book from the point of view literary analysis can be found here.
Atlas Obscura has samples of a 12 year old’s botanical cyanotypes here. Educators might find this inspiring.
Cyanotype techniques
Toning can alter the bright blue color of cyanotypes. Jacquard has a guide to toning cyanotypes to produce various colors.
The “Koraks Tinkers” blog has a post pointing out the difference between collimated vs. diffuse light when exposing cyanotypes. Direct sunlight provides collimated light, while an overcast day provides diffuse light. This difference is less important when making contact prints from a negative, but will produce quite different results with 3-D objects. Cloudy skies = diffuse light, and blurred edges. Clear skies = collimated light, and sharp edges.
UV light boxes
A UV light box allows you to expose cyanotypes indoors, or at night. I finally decided not to build a UV light box (no room for one in our tiny apartment), but here’s some info I collected while researching them.
Photographer Steph Coffman has a page on her website detailing how she made a UV light box — inexpensive and effective. A photography teacher from CCSF shows how to make an even cheaper UV light box — unfortunately, the UV light source she used is no longer available; her video is still worth watching, just to see how she does it. The Alternative Photography website has instructions for making inexpensive UV boxes. Finally, the “Koraks Tinkers” blog shows how to build your own custom UV light box with an LED array — but you have to be comfortable using soldering irons and test equipment.