I was reading the chapter on mordants in the book Craft of the Dyer: Colour from Plants and Lichens (by Karen leigh Casselman, 2nd ed., Dover Publications, 1993), when I came across this: “Some dye plants are used in the pot as mordants. This is true with alder and with sumac leaves.” (p. 40). (In case you’re not familiar with the term, a mordant is a substance used to help fix dyes in the cloth; a mordant helps make the dye color more light-fast, and helps the color stand up to washing better.)
This summer, I got interested in hammer dyeing (also known as “plant pounding”). This process transfers plant colors to cloth by hammering the plant against the cloth (details on the process are in this blog post). One problem with hammer dyeing is that the colors are not always lightfast, and may not stand up well to washing. But if sumac leaves can act as both mordant and dye-stuff, I wondered if they might produce a more permanent color if used for hammer-dyeing.
So I hammer-dyed a t-shirt using sumac leaves. And yes, they did indeed stand up to washing. As for lightfastness, only time will tell.
To see photos and a description of the whole process, scroll down.
“Hammer dyeing” is a technique where you transfer the shape and color of leaves and flowers to cloth or paper by hammering. The process is fairly simple: you place plant material on cloth or heavy paper; cover with cloth, heavy paper, or plastic wrap; then hammer the plant material to release its juices which stain the cloth or paper. This article covers hammer dyeing projects that are intended for inclusion in nature journals.
The technique goes under several different names: “flower pounding,” “hammer printing,” “hammer staining,” “leaf hammering,” “tataki-zome,” “hapa-zome,” “Cherokee leaf pounding,” etc.; but I prefer to call it “hammer dyeing.”
Origins of hammer dyeing
I found no well-documented source giving the origins of hammer dyeing. I suspect the technique arose independently in several cultures.
Some online sources call this technique tataki-zome or hapa-zome, and claim it’s an “ancient Japanese art form,” but without citing any sources. A search on Google Books turns up many references to tataki-zome from 2000 on, but I could find only one reference prior to that date: Rita Buchanan, in Dyes from Nature (Brooklyn Botanical Garden Record, Plants and Gardens, vol. 46 no. 3, autumn 1990), p. 79, says that students learning how to dye in Japan practice tataki-zome: “Using their own plants, they learn dyeing techniques such as batik, itajime — a sort of variegated effect made with wood chips, and tataki-zome, a way of mashing plants on the cloth.” More research is needed to determine if tataki-zome is actually a traditional Japanese art form.
Alabama quilter Bettye Kimbrell (1936-2016), named a National Heritage Fellow by the National Endowment for the Arts, used a hammer dyeing technique she called “Cherokee leaf pounding.” It’s not clear this technique was actually used by the Cherokee people, so it’s best to consider this an American folk art with uncertain historical roots. Kimbrell used this technique in her quilts: “Cherokee leaf pounding is a technique where a fresh green leaf is taped to the backside of muslin fabric with masking tape. Using a hammer, gently pounding the leaf allows the chlorophyll to stain the fabric. After transferring each leaf to the fabric, the stain is set with a vinegar and water solution. The fabric is then dried and entirely hand quilted.” (Kristin G. Congdon and Kara Kelley Hallmark, American Folk Art: A Regional Reference, vol. 1 [Bloomsbury Publishing, 2012], p. 226.) More about her process here.
Screenshot from a PBS video on Bettye Kimbrell, showing her hammer dyeing a quilt. Click on the image to watch the video on the PBS website.
Books and references on hammer dyeing
For a comprehensive reference book on this technique, see Laura C. Martin, The Art and Craft of Pounding Flowers (Mt. Kisco, NY: QVC Publishing, 2001; Rodale Press, 2003). Martin covers which types of flowers, and which types of leaves, produce the best results; mordanting fabrics so the image is perhaps more light-fast; setting the image with a hot iron; etc. Unfortunately the book is now out of print. Used copies can be found on Thriftbooks (please do not buy from evil Amazon). The Internet Archive has a copy online that can be borrowed. The first 32 pages of the book are available on Google Books.
I’ve found references to two other books about the process: (1) Ann Frischkorn and Amy Sandrin, Flower Pounding: Quilt Projects for All Ages (Concord, Calif.: C & T Publishing, 2001); and (2) Linda Rudkin, Flower Pounding (London, U.K.: A & C Black Publishers, 2011). I haven’t seen either book, so can’t comment on them.
My curriculum website has instructions for doing flower pounding with children, using inexpensive watercolor paper. Scroll down to “V/Printmaking,” then go to project “D/Pounding flowers.” The technique I describe has been extensively field tested with children from grade 1-8, and produces reliable results. However, this technique is more focused on process than product (“process art”), and is not suitable for use in a nature journal curriculum.
Hammer-dyed fern on bleached cotton muslin, 36 inches wide. No mordant or scouring, but the image was set using a steam iron. The darker places are plant material deliberately left on the finished image. Image copyright (c) 2025 Dan Harper.
Hammer dyeing process
Earlier this month, during a week-long family conference at a Unitarian Universalist summer camp, I was leading an ecology workshop that centered around participants recording thoughts, feelings, and observations about the nature in journals (i.e., nature journaling). My co-leader, Rebecca, who is a middle school teacher, contributed to the development of this activity (thanks, Rebecca!). During this workshop, we field-tested a procedure for hammer dyeing. The process, outline below, is easy to set up, and is designed to help participants become more aware of the details of leaves and flowers.
Tools needed
Hammer, at least 1 for every 2 participants (see discussion of hammer types below)
Disposable foam ear plugs
Table with a hard flat surface
Materials
Thin cotton muslin cloth, 36 or 45 inches wide
Leaves, flowers
A rule of thumb for collecting leaves and flowers: Collect just 1 out of 20 similar leaves/flowers.
A note about fabric: I used to go to Joann Fabric to buy cloth for class projects, but they went out of business this year. Michael’s purchased Joann Fabric intellectual property, and one of the local Michael’s stores does carry 45″ cotton muslin in stock. My preferred online source for fabric is Dharma Trading Post, but as of this writing their popular 45 inch cotton muslin is out of stock.
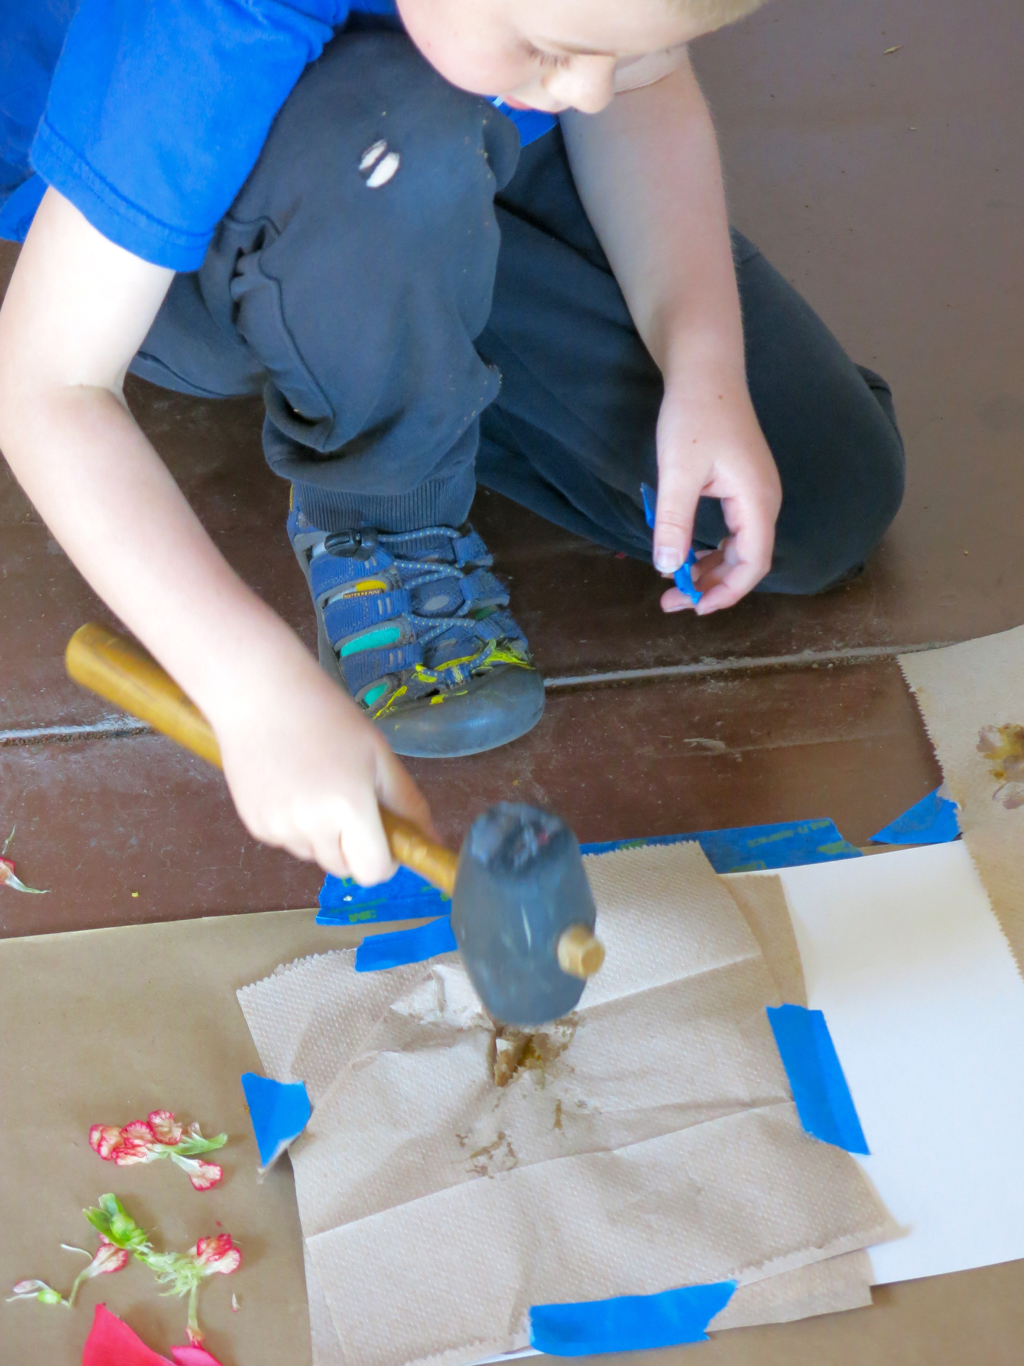
One of the best projects we did in Nature Camp last week was “Pounding Flowers,” a project from the book A Little Bit of Dirt: 55+ Science and Art Activities To Reconnect Children with Nature by Asia Citro (Woodinville, Wash.: Innovation Press, 2015), pp. 72-73. The idea is to collect several different flowers, arrange them on a piece of watercolor paper, cover them with paper towels, and pound the heck out of the flowers so that they release their juices which are then absorbed by the watercolor paper.
Our campers, who were ages 6-7, particularly enjoyed pounding the flowers with rubber mallets. So did we adults: the feel of the impact of the rubber mallet on a hard concrete floor was satisfying in itself, and the addition of the flowers sandwiched between towels and watercolor paper was even better.
(Photo courtesy of Ecojustice Camp; parents provided a media release for this child.)
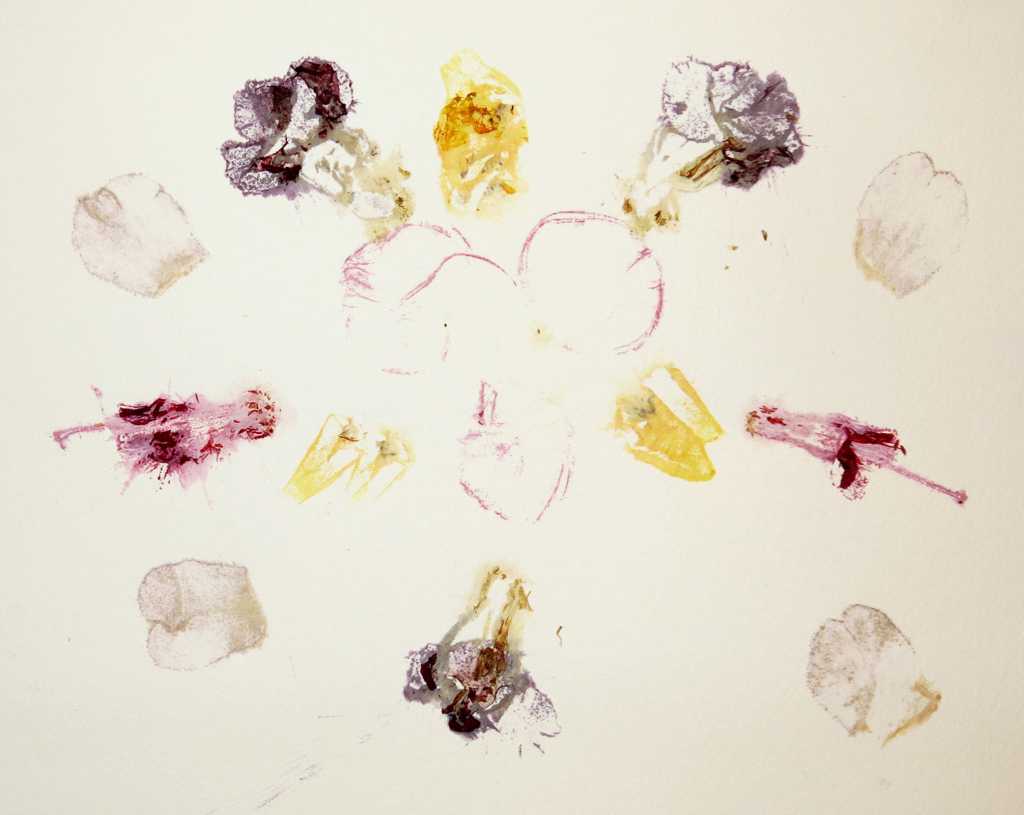
But I was not entirely satisfied with this project myself. The paper towels did not work very well; they tended to shred under heavy pounding, and the flowers tended to shift under them. So tonight I tried something different. I collected some flowers; arranged them on a piece of watercolor paper on a smooth concrete surface; then instead of paper towels I laid another piece of watercolor paper over the arrangement, and pressed gently down.
This worked extremely well. It was even more satisfying to pound on, because the top piece of watercolor paper didn’t shred, and it didn’t shift much. When I was done, I got two pieces of pounding art, mirror images of one another. And, best of all, this process yielded more detail of the flowers: I got distinct outlines of the petals or pistils in some cases.
This was a very fun process art project to begin with, and by sandwiching the flowers between two pieces of watercolor paper it got even better.
Update, July 15, 2025: For a more sophisticated version of this art project, see my post on hammer dyeing.