“Hammer dyeing” is a technique where you transfer the shape and color of leaves and flowers to cloth or paper by hammering. The process is fairly simple: you place plant material on cloth or heavy paper; cover with cloth, heavy paper, or plastic wrap; then hammer the plant material to release its juices which stain the cloth or paper. This article covers hammer dyeing projects that are intended for inclusion in nature journals.
The technique goes under several different names: “flower pounding,” “hammer printing,” “hammer staining,” “leaf hammering,” “tataki-zome,” “hapa-zome,” “Cherokee leaf pounding,” etc.; but I prefer to call it “hammer dyeing.”
Origins of hammer dyeing
I found no well-documented source giving the origins of hammer dyeing. I suspect the technique arose independently in several cultures.
Some online sources call this technique tataki-zome or hapa-zome, and claim it’s an “ancient Japanese art form,” but without citing any sources. A search on Google Books turns up many references to tataki-zome from 2000 on, but I could find only one reference prior to that date: Rita Buchanan, in Dyes from Nature (Brooklyn Botanical Garden Record, Plants and Gardens, vol. 46 no. 3, autumn 1990), p. 79, says that students learning how to dye in Japan practice tataki-zome: “Using their own plants, they learn dyeing techniques such as batik, itajime — a sort of variegated effect made with wood chips, and tataki-zome, a way of mashing plants on the cloth.” More research is needed to determine if tataki-zome is actually a traditional Japanese art form.
Alabama quilter Bettye Kimbrell (1936-2016), named a National Heritage Fellow by the National Endowment for the Arts, used a hammer dyeing technique she called “Cherokee leaf pounding.” It’s not clear this technique was actually used by the Cherokee people, so it’s best to consider this an American folk art with uncertain historical roots. Kimbrell used this technique in her quilts: “Cherokee leaf pounding is a technique where a fresh green leaf is taped to the backside of muslin fabric with masking tape. Using a hammer, gently pounding the leaf allows the chlorophyll to stain the fabric. After transferring each leaf to the fabric, the stain is set with a vinegar and water solution. The fabric is then dried and entirely hand quilted.” (Kristin G. Congdon and Kara Kelley Hallmark, American Folk Art: A Regional Reference, vol. 1 [Bloomsbury Publishing, 2012], p. 226.) More about her process here.

Books and references on hammer dyeing
For a comprehensive reference book on this technique, see Laura C. Martin, The Art and Craft of Pounding Flowers (Mt. Kisco, NY: QVC Publishing, 2001; Rodale Press, 2003). Martin covers which types of flowers, and which types of leaves, produce the best results; mordanting fabrics so the image is perhaps more light-fast; setting the image with a hot iron; etc. Unfortunately the book is now out of print. Used copies can be found on Thriftbooks (please do not buy from evil Amazon). The Internet Archive has a copy online that can be borrowed. The first 32 pages of the book are available on Google Books.
I’ve found references to two other books about the process: (1) Ann Frischkorn and Amy Sandrin, Flower Pounding: Quilt Projects for All Ages (Concord, Calif.: C & T Publishing, 2001); and (2) Linda Rudkin, Flower Pounding (London, U.K.: A & C Black Publishers, 2011). I haven’t seen either book, so can’t comment on them.
PBS has a video with Bettye Kimbrell demonstrating her leaf pounding technique. Sadly, the video does not show her technique for setting the image in vinegar (see below).
My curriculum website has instructions for doing flower pounding with children, using inexpensive watercolor paper. Scroll down to “V/Printmaking,” then go to project “D/Pounding flowers.” The technique I describe has been extensively field tested with children from grade 1-8, and produces reliable results. However, this technique is more focused on process than product (“process art”), and is not suitable for use in a nature journal curriculum.

Hammer dyeing process
Earlier this month, during a week-long family conference at a Unitarian Universalist summer camp, I was leading an ecology workshop that centered around participants recording thoughts, feelings, and observations about the nature in journals (i.e., nature journaling). My co-leader, Rebecca, who is a middle school teacher, contributed to the development of this activity (thanks, Rebecca!). During this workshop, we field-tested a procedure for hammer dyeing. The process, outline below, is easy to set up, and is designed to help participants become more aware of the details of leaves and flowers.
Tools needed
- Hammer, at least 1 for every 2 participants (see discussion of hammer types below)
- Disposable foam ear plugs
- Table with a hard flat surface
Materials
- Thin cotton muslin cloth, 36 or 45 inches wide
- Leaves, flowers
A rule of thumb for collecting leaves and flowers: Collect just 1 out of 20 similar leaves/flowers.
A note about fabric: I used to go to Joann Fabric to buy cloth for class projects, but they went out of business this year. Michael’s purchased Joann Fabric intellectual property, and one of the local Michael’s stores does carry 45″ cotton muslin in stock. My preferred online source for fabric is Dharma Trading Post, but as of this writing their popular 45 inch cotton muslin is out of stock.
Process
Participants find leaves and flowers from which they would like to make impressions. We found that leaves and ferns are very satisfying to work with. Complete flowers — especially larger flowers with a high moisture content — may to turn into an amorphous mush using this process; however, individual flower petals work quite well.
Start with a piece of muslin about 18 inches by 36 inches. We cut our pieces of cloth with pinking shears, both to reduce unravelling of cloth edges and to experiment with different shapes of cloth. More simply, you could simply tear an 18 inch length from the bolt of cloth.
Fold the cloth in half, leaving a fold line. Place a leaf on one half of the cloth, then fold the other half over. You should be able to see the leaf through the thin muslin cloth. Hold the leaf down with one hand, while you begin hammering gently. Start with light taps, hammering more heavily when needed. Most people wanted to wear ear plugs while hammering.
We tried several different types of hammer: a standard carpenter’s claw hammer with a 16 ounce heard; a small claw hammer with a 7 ounce head; and a large 16 oz. rubber mallet. The rubber mallet worked for large wet mushy flowers, but did not work well for leaves. The 7 ounce hammer worked reasonably well for fine details. The 16 ounce hammer was the preferred choice for adult participants, though a lighter 7 to 10 ounce hammer might be less tiring, while producing equivalent results. (I used my favorite 20 ounce framing hammer; but I have pretty strong forearms, and you might not like a hammer this heavy.) If you can’t borrow enough hammers for your class, you can buy 10 ounce hammers on eBay and Etsy, or at Home Depot, for about 7 dollars each. My local hardware store has 8 ounce hammers in stock at 10 dollars each.
The design soaks through the thin muslin cloth as you’re hammering, so you can see your progress. Participants enjoyed experimenting with different methods of hammering, but the method that produced the best results for most participants seemed to be this: hold the hammer about halfway up the handle (or even near the head); start at one end of the leaf with light taps, and gradually work your way over the entire surface of the leaf; vary the angle of the hammer head if you need to reveal fine detail.
Once you have finished hammering one leaf, unfold the cloth. Peel the remains of the leaf. If it doesn’t peel off easily, you can use your fingernails to get more off; or just let it dry, and gently scrape it off with fingernails or a knife.
You can add to your design by hammering more leaves of flowers. Some participants laid out lots of leaves/flowers at the beginning; that’s fine, just be aware that while you’re hammering one leaf/flower, the others can shift. Most participants wound up working on just one leaf/flower at a time.
This proved to be a satisfying and meditative activity for most participants. As the details of the leaves are slowly revealed by hammering, it helps focus you on the details of the leaf structure. Hammering tends to smush flowers, so you’re not seeing much in the way of the flower’s structure; but since hammering flowers don’t always produce the color you’d expect, it does tend to focus your attention on the precise color of the flower.
The process outlined above results in mirror-image designs on opposite sides of the cloth.
Note that this process minimizes waste. Some online Japanese sites give instructions for hammer dyeing using plastic wrap to secure the plant material to the cloth or paper; however, I can’t see using disposable single-use plastic in an ecology workshop. Bettye Kimbrell’s technique of applying single leaves to a piece of cloth with masking tape (see description below) uses regular masking tape which is made of crepe paper, and may recyclable or compostable (depending on the paper used); however, the adhesive on the tape is likely to be a synthetic resin, and may not be compostable.
Hammer dyeing in nature journals
I had hoped that participants would want to incorporate hammer-dyed leaf images into their nature journals. Unfortunately, the cloth we used was too big to fit into the 5-1/2 x 8-1/2 inch journals we had. So I’ve been thinking about two different ways to integrate this project with nature journals.
First, and most obviously, start people off with pieces of cloth sized to fit into 5-1/2 x 8-1/2 inch journals. The fabric can then be taped, stapled, or glued into the nature journal. Bettye Kimbrell uses a different hammer dyeing process where you secure the plant material to the cloth using masking tape, completely covering the plant material; then turn the cloth over and hammer the leaf through the cloth. Kimbrell’s process is detailed here. Obviously, this wouldn’t work well for large projects — it would take a lot of masking tape to secure an 18 inch fern frond to fabric. But I’m thinking about using Kimbrell’s process for smaller pieces that could be included in nature journals — start with a square of cloth sized to fit the nature journal, tape the plant material on one side, hammer away, include the final product in the nature journal. However, the disposable tape makes Kimbrell’s technique somewhat less attractive (see note above at the end of the “Process” section).
Second, and perhaps more interesting, I may rethink the size and format of nature journals. I’ve been considering a different kind of nature journal, in the form of a loose-leaf portfolio capable of fitting sheets of many sizes and thicknesses. Then the large pieces of cloth that has been hammer-dyed could be placed inside a large sheet of paper folded in half; or it could be mounted on a piece of bristol board or cardstock; either way, the hammer-dyed cloth could then be safely inserted into the portfolio.
Lightfastness
Most hammer-dyed images are probably not going to be lighfast. Leaves, for example, may produce green images that fade to brown over time.
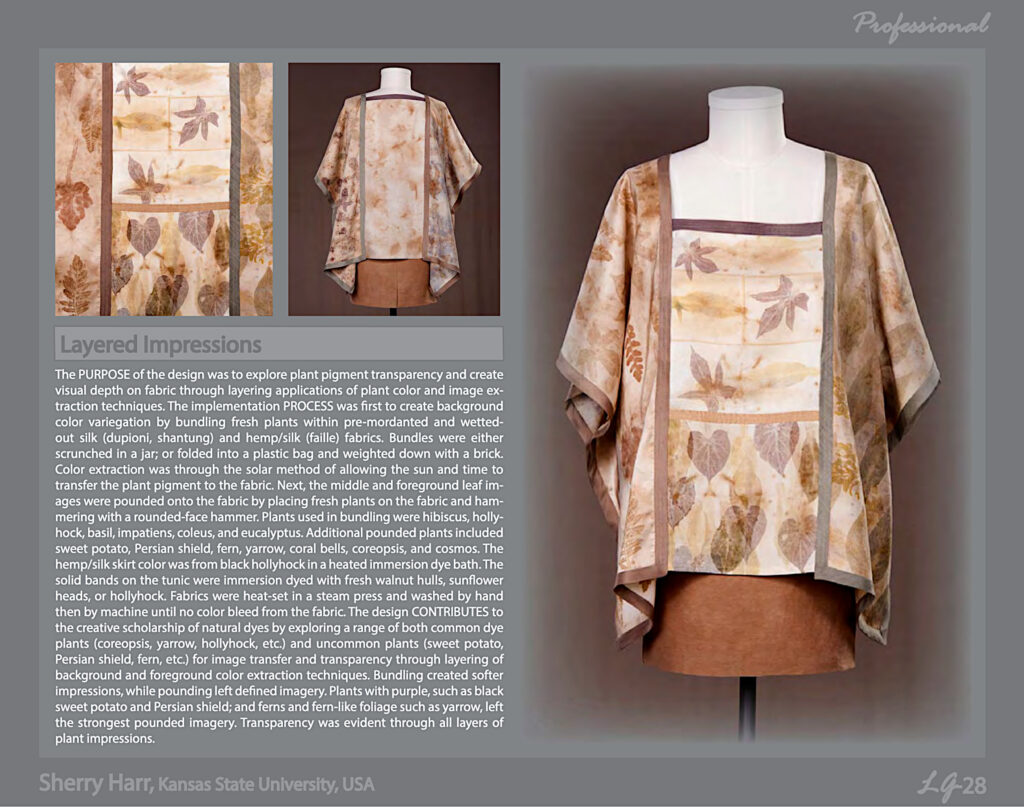
If you’re doing this as a stand-alone dyeing project, there are ways to make the images more lightfast. After much experimenting, professors Sherry Haar and Kelsie Doty of Kansas State University state: “Overall, a steam treatment is recommended to assist with color and image retention for pounded plants onto cotton fabric that is scoured [i.e. pre-washed] and mordanted with aluminum acetate [a.k.a. alum].” If you really want lightfast hammer-dyed images, it’s worth reading their full study: Haar and Doty, “Pounded plants on cotton: Methods, outcomes, and colorfastness of post-treatments,” in: A. Luximon (ed.), 10th International Shibori Symposium Official Proceedings 2016 Oaxaca, Mexico (Berkeley, Calif.: World Shibori Network, 2017), pp. 59-66. Sherry Harr uses hammer dyeing as a serious design element in fashion design; see the screenshot below.
There’s another process to make the images more lightfast — Bettye Kimbrell set her hammer-dyed images in a vinegar solution, accpeting a brown color as the desired eventual outcome of the process. To use Kimbrell’s process, soak the cloth for an hour in a solution of one pint of white vinegar to one gallon of water, then handwash the fabric in a clear detergent or dishwashing liquid to remove any plant material; rinse the fabric until the water runs clear, gently wring out, and hang to dry. Kimbrell’s process is worth noting because her quilts have retained hammer dyed images over many years.
If you have a bigger budget for cloth, you could also experiment with animal-based fabrics such as wool and silk. See this blog post for a process that produced lightfast hammer-dyed images on wool, involving “simmering the cloth in a weak afterbath of weld leaves.”
The only post-treatment I’ve tried is ironing with a steam iron. Honestly, pre-treatments like scouring and mordanting require more effort than I’m willing to put into a class nature journal project. Same for setting images in a vinegar bath, or other post-treatments — too much work for a nature journal class, where the emphasis should be on connecting with natural objects. I do feel that steaming using a conventional steam iron is worth considering in a class with older kids, teens, and adults; it’s quick and easy, and besides you’ll want the cloth flattened out for inclusion in a journal. Using a steam iron on “cotton” heat setting, I iron the reverse side of the hammer-dyed image; it’s probably best to protect the surface of the ironing board by placing scrap cloth under the hammer-dyed image. Ironing is very satisfying, and I find that while I’m ironing I look closely at the hammer-dyed image.
Finally, remember that hammer-dyed images intended for a nature journal need not be especially lightfast — they will be stored in a book or a portfolio, and rarely exposed to light.
Updated 16 July 2025: Correcting many typos, and including more info about Bettye Kimbrell, screenshot showing Sherry Harr’s work, etc. Updated 18 July with info on masking tape.
Dan, send this to me:
Welcome to the Eco-Outhouse!
Maintenance
Sweep
Check level of composter:
Use flashlight and check level of composter or go to back, unlatch door, pull out composter to check level.
If getting to top, pull out, cap and put to side of outhouse.
Replace with empty composter. Place a couple inches of additive (the chaff, wood chips, or buckwheat hulls in the blue container in the outhouse).
The composters are emptied twice a year in a secondary composter.
Check level of urine jug on side of outhouse. Empty around trees.
Check levels of additive container. Fill as needed.
Empty trash, replace empty hand sanitizer, etc.
In response to Carol’s comment — My spouse gets to write whatever she wants on my blog, even if it doesn’t seem especially relevant… (and I hope she’s not suggesting using urine for hammer dyeing, because that sounds very messy).